Name Patches for Work Shirts: Where to Sew Them
Exact gaps, sides and heights for shirts, coveralls and flight suits.
Embroidered name badges look sharp only when they sit straight and level. Use these exact measurements for work shirts, coveralls and flight suits.
QUICK CHART
Name Patch Placement Chart: Side, Height and Spacing by Garment
Start here. This chart lists common starting points for each garment. Your dress code always wins. Read across the row for your shirt, then jump to its section.
| Garment | Side | Height | Spacing |
|---|---|---|---|
| Work shirt with pocket | Right or left | Above pocket seam | 1/2 to 1 inch gap |
| Work shirt, no pocket | Match the logo side | Level with pocket line | Clear of placket |
| Polo | Left chest | Below collar point | Clear of placket |
| Coverall | Chest panel | Above the zip line | Off every seam |
| Apron | Bib top | Centered on bib | Clear of ties |
| Flight suit | Chest panel | Rulebook decides | Hook panel if allowed |
| Duty uniform | Rulebook decides | Rulebook decides | Rulebook decides |
- Work shirts: pocket gap and side
- No pocket: placket and seam guides
- Coveralls, jackets and aprons
- Flight suits and swappable panels
- Military uniforms and the rulebook
- Fixed or swappable attachment
Why use a chart at all? Name patches fail on small errors. A gap that is off by half an inch shows from across a room. Measure once, then repeat the same numbers on every shirt.
WORK SHIRTS
Name Patches for Work Shirts: Pocket Gap, Side and Centering
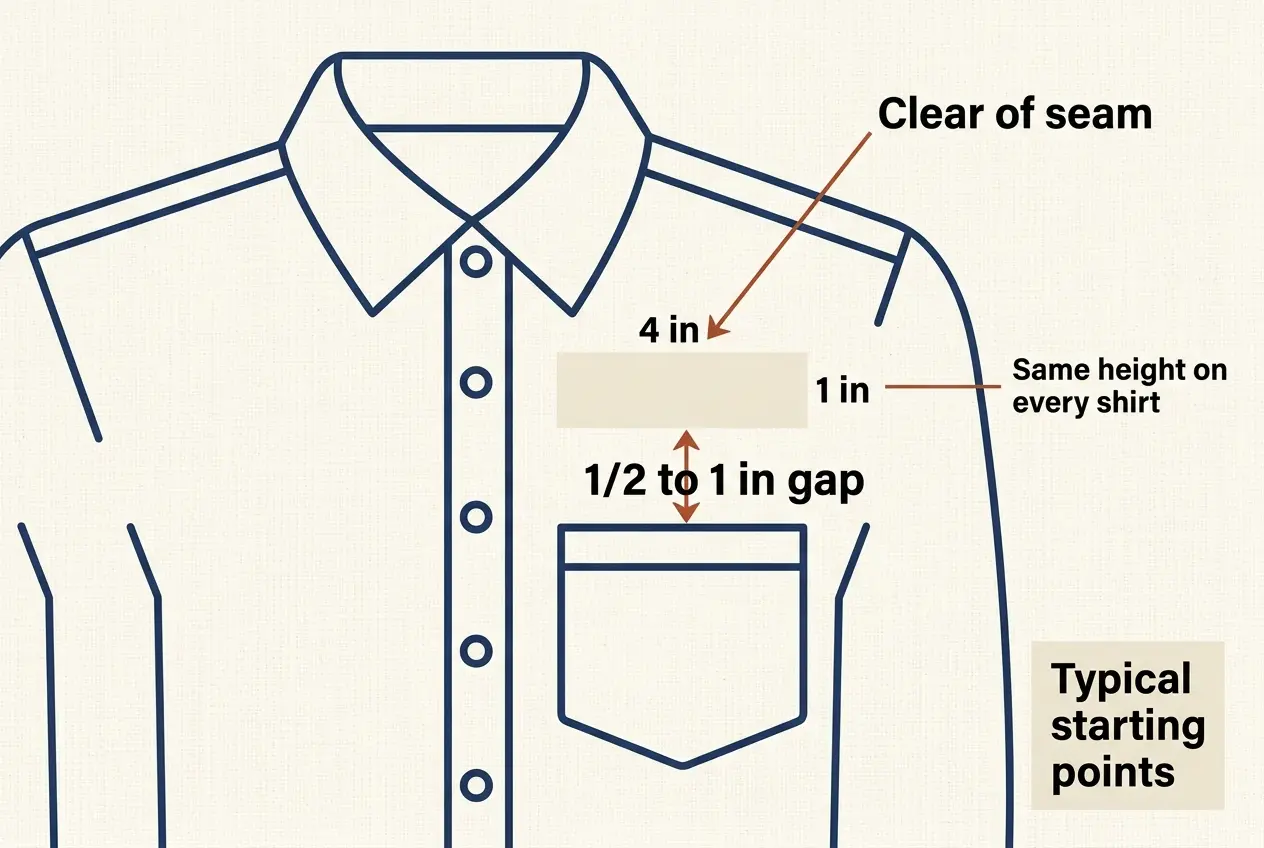
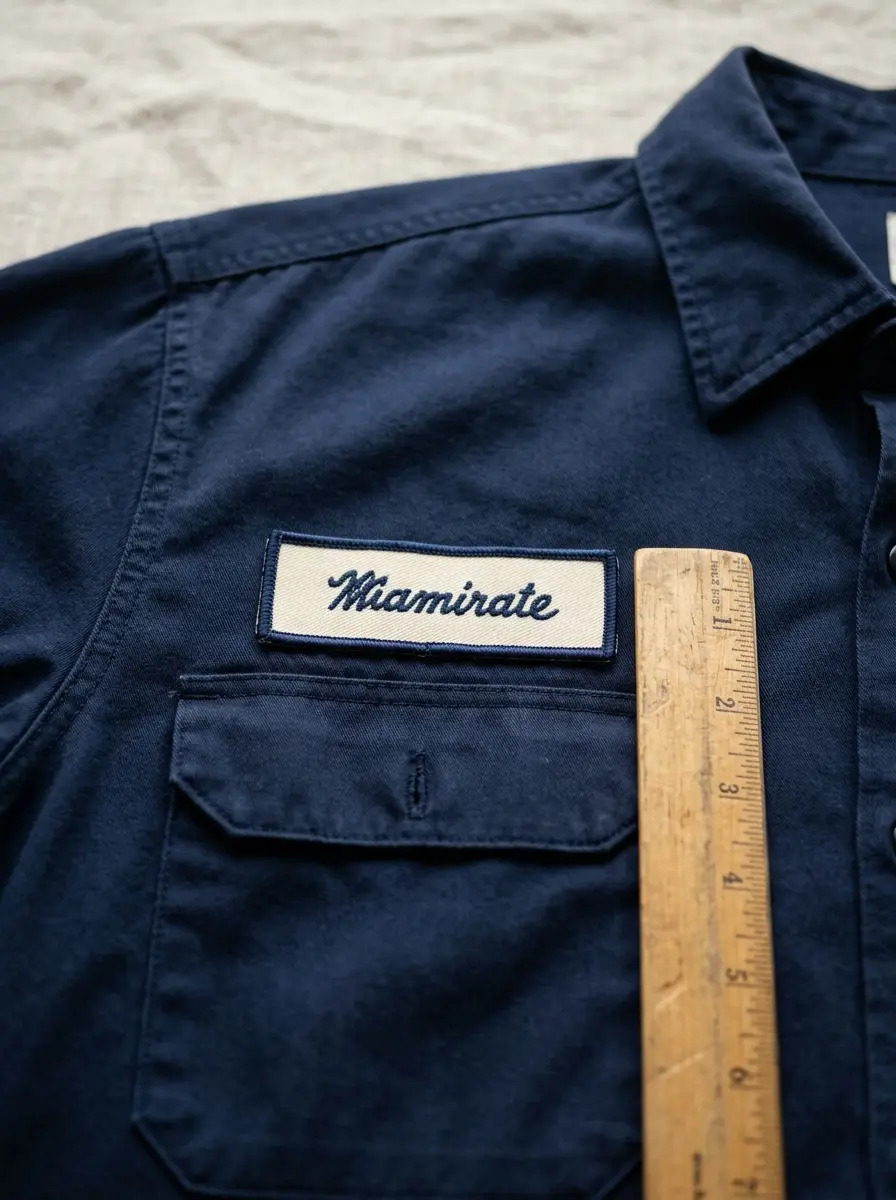
A shirt with a chest pocket gives you built-in guides. Use the pocket top as your zero line. Everything else is measured from there.
Check the pocket itself. Is it square or angled? Some pockets taper at the bottom. Measure the top edge, because that edge sets your line.
| Check | Typical starting point | Why it matters |
|---|---|---|
| Gap above pocket | 1/2 to 1 inch | Patch will not touch the flap |
| Side | Right or left, one choice | Team looks even |
| Centering | On the pocket center line | Reads as one unit |
| Patch width | Narrower than the pocket | Shows a clean margin |
| Seam clearance | A thumb width | Edges stay flat |
Common on company shirts. Pairs with a left logo.
Common on polos. Sits over the heart.
Name on one, role on the other. Keep heights equal.
- Pick one side for the whole team
- Measure from the pocket top, not the hem
- Keep the patch level with the pocket line
- Stay off the collar and shoulder seam
- Pin first and try the shirt on
- Check it in a mirror
Many company shirts carry the name on the right. Some carry it on the left. Either works if every shirt matches. A logo on the opposite side keeps the chest balanced.
Pocket flaps need care. A flap opens and bends anything stitched across it. Sew the patch above the flap seam, not on it. Button-down pockets with no flap give you more room.
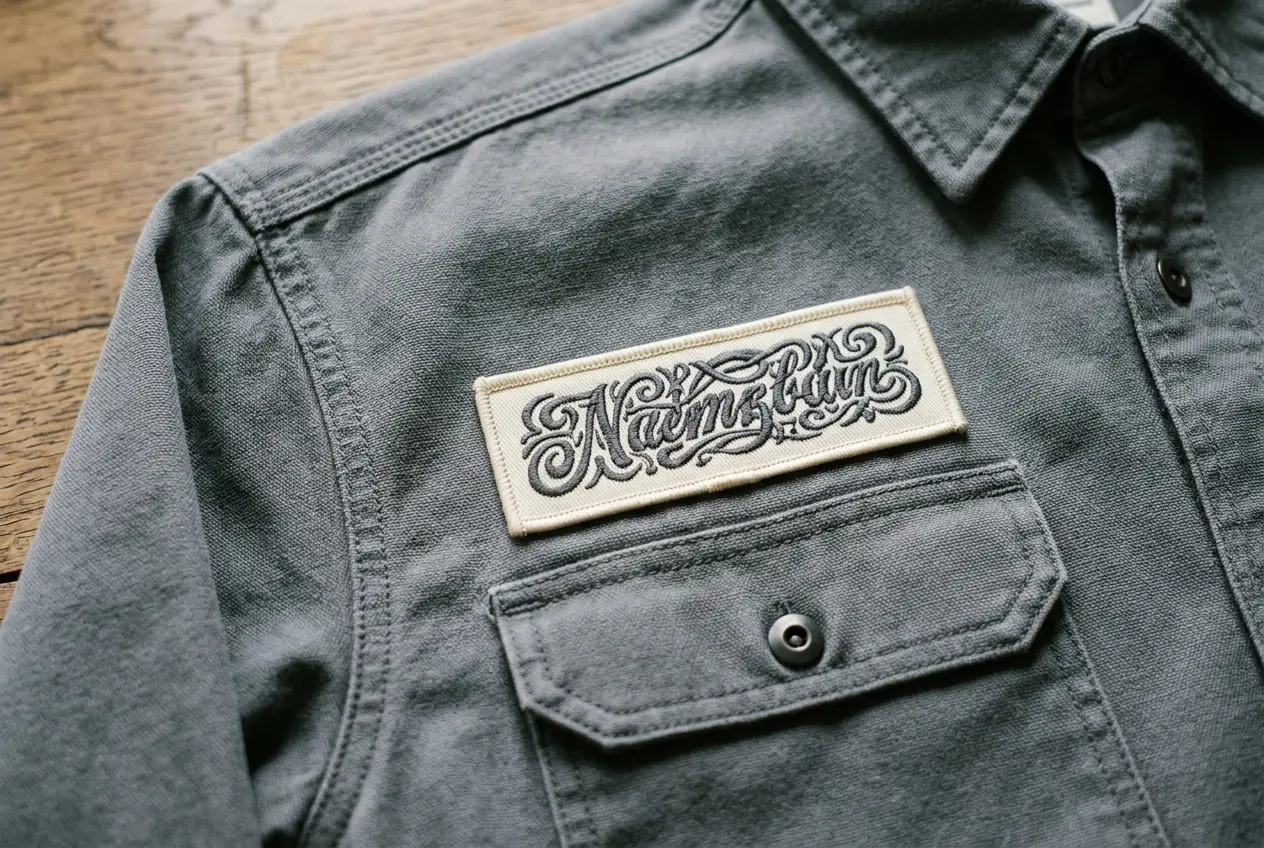
- Match thread to the patch border
- Skip metallic thread on work shirts
- Pull stitches snug, not tight
- Press the shirt flat before you mark
Shirts With No Pocket: Use the Placket and Shoulder Seam
Plain shirts and tees have no pocket line to follow. The placket runs straight down the front. Use it as your vertical guide.
- Button the shirt and lay it flat.
- Find the placket edge and the shoulder seam.
- Mark a level line with chalk.
- Tape the patch, then try it on.
HEAVY GEAR
Coveralls, Jackets and Aprons: Where Name Patches Sit on Heavy Gear
Thick fabric changes the rules. Stitches need room, and seams fight the patch. Keep the patch on one flat panel. A coverall chest is usually flat, so it takes a name patch well.
| Garment | Best spot | Avoid |
|---|---|---|
| Coverall | Chest panel above the zip line | Zip teeth and thick seams |
| Work jacket | Upper chest, one flat panel | Front seam and pocket edge |
| Apron | Center of the bib top | Neck strap and tie edges |
- Use a heavier needle for twill and canvas
- Sew through one layer where possible
- Test the stitch line on a scrap
- Keep the patch off every zip line
Heavy fabric hides small errors. It hides nothing about a crooked patch. Mark it with the same care you give a dress shirt. Use a long ruler and a fabric marker that washes out.
- Canvas and twill hide stitches well
- Thin aprons pucker under heavy thread
- Reinforce a thin bib with a soft backing
Planning a full jacket layout? Our patch placement guide covers more spots.
FLIGHT SUITS
Flight Suit Name Patch: Chest Position and Swappable Panels
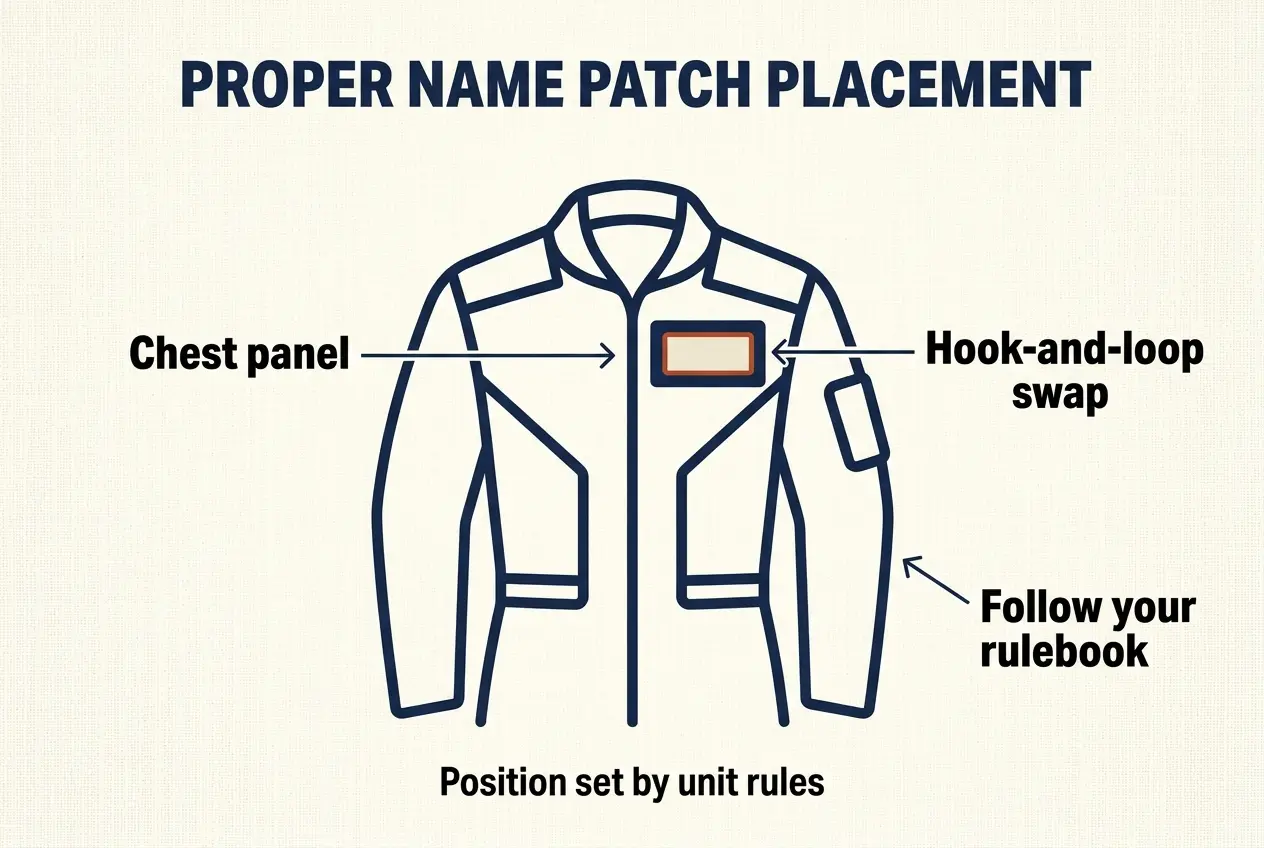
Flight suits have their own layout. Many carry a hook-and-loop panel on the chest. That panel lets a name change in seconds.
- Chest panel
- The flat area where the name sits.
- Hook panel
- A loop or hook strip sewn to the suit.
- Name patch
- Your name, with a matching hook backing.
- Command patch
- A unit item with its own rule.
- Panel width
- Name length
- Number of names
- Hook or sewn backing
Send those four details with your order. We size the patch to the panel. Place the panel first. Then line the name patch up with it. The patch should never hang over the panel edge.
Rules differ by service and unit. Your uniform manual sets the side, height and size. We make custom flight patches, not issue items.
Pros
- Swap names without a needle
- Reuse the panel for other patches
- Fast fix after a name change
Limits
- Panel adds thickness
- Loose hook can snag fabric
- Not every rulebook allows it
MILITARY RULES
Where a Military Name Patch Goes: The Rulebook Decides
Duty uniforms follow written rules. Side, size and font are set for you. Many duty uniforms put the name tape over the right chest pocket.
A custom patch is not an issue item. Do not treat it as one. It cannot replace the name tape your rulebook requires. Use custom patches where your unit allows them.
| Question | Who decides | Where to look |
|---|---|---|
| Which side | Service uniform rules | Your uniform manual |
| What size | Service uniform rules | Your uniform manual |
| Sew or hook | Unit and rulebook | Your chain of command |
- Read your uniform manual first
- Ask before adding any patch
- Keep custom items off issue positions
- Save a photo of the approved layout
ATTACHMENT
Fixed or Swappable: How Attachment Changes Name Patch Position
Your backing choice changes where the patch can sit. Embroidered name badges with a sewn edge stay flat and fixed. Hook-and-loop badges can move.
| Backing | Position | Best for |
|---|---|---|
| Sewn on | Fixed after stitching | Shirts washed weekly |
| Hook-and-loop | Movable, panel needed | Shared or swapped names |
| Sewn panel plus hook | Panel fixed, name moves | Flight suits and vests |
| Both options | Choose per shirt | Mixed teams |
Pros
- Sewn patches sit flat
- Hook patches swap fast
- A panel keeps spacing exact
Limits
- Sewn patches need a seam ripper
- Hook patches add bulk
- Panels need their own stitching
- Sewn: mark once, stitch once
- Hook: sew the loop panel first
- Keep the panel straight to the pocket line
Stitch lines also matter. A panel needs two long seams. A sewn patch needs one loop of stitching. Plan the space for either.
Think about wear time too. A shirt that changes hands often suits a panel. A personal shirt suits stitching.
Want the full comparison? Read patch backings and sew-on or iron-on.
SEWING STEPS
Mark, Pin and Sew a Name Patch Dead Level
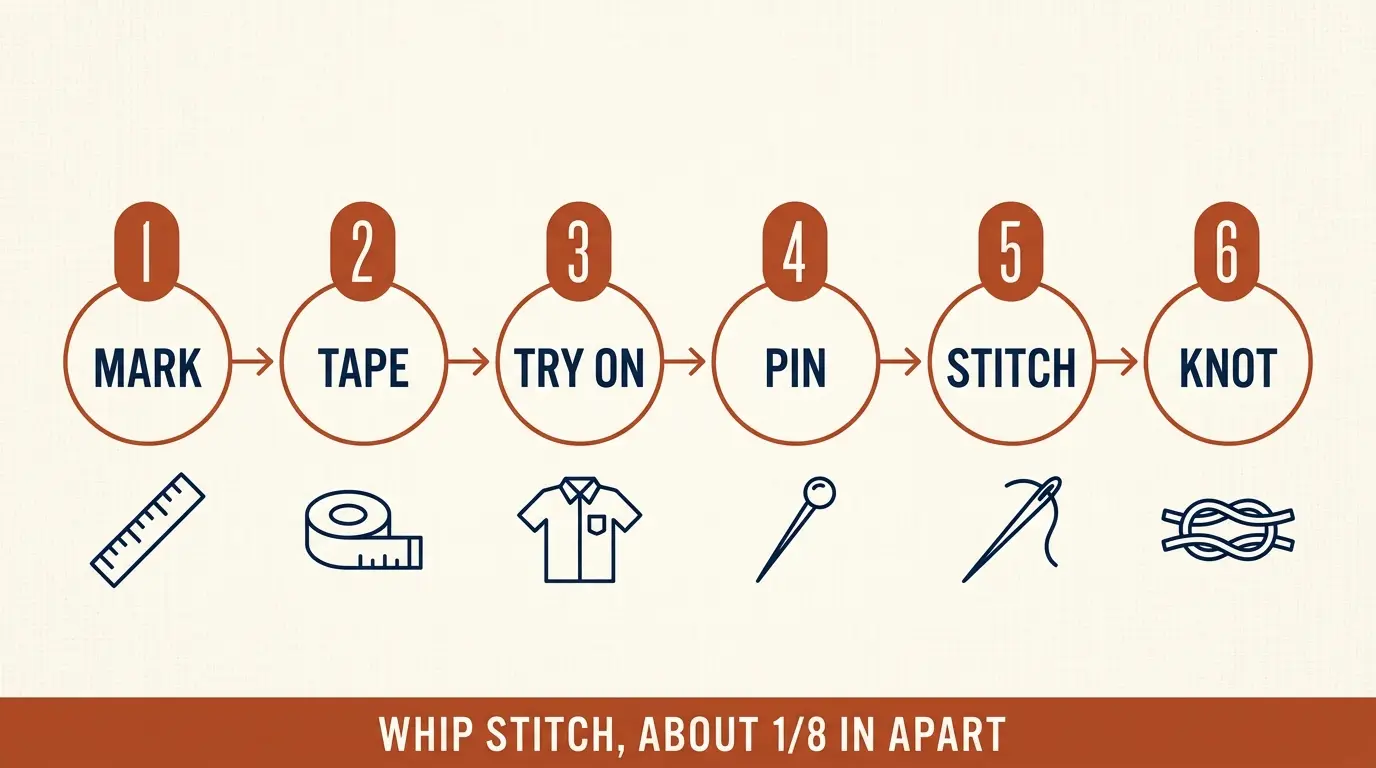
A level patch needs a level line. Mark it before you pick up the needle.
- Mark the line
Use chalk and a ruler along the pocket top.
- Tape the patch
Painter's tape holds it without marks.
- Try it on
Check the hang in a mirror.
- Pin the corners
Use four straight pins.
- Stitch the edge
Use a whip stitch, about 1/8 inch apart.
- Knot inside
Tie two knots behind the patch.
| Detail | Typical choice |
|---|---|
| Thread | Polyester, matched to border |
| Thread length | 18 to 24 inches |
| Stitch spacing | About 1/8 inch |
| Knots | Two, hidden inside |
Take your time on the corners. Corners lift first. Stitch each one twice. Keep stitches even in length. Tight stitches pucker the shirt. Loose stitches let the edge curl. Press the finished patch flat with a cloth between the iron and the thread.
- Patch drifts: re-pin all four corners
- Corners lift: add one extra stitch
- Shirt puckers: loosen your tension
- Patch sits low: remeasure from the pocket
Need a full stitching walkthrough? See how to sew on a patch.
TEAM TEMPLATE
Matching Every Name Patch Across a Team: One Paper Template
Name patches for work shirts look best when every shirt matches. Cut a paper template and use it on each one.
- Cut paper to the patch size
- Mark the pocket top on the template
- Add the gap line
- Make one template per shirt size
- Tape and trace on every shirt
Shirt sizes shift the pocket. A small shirt has a smaller chest. Make a template for each size group, then mark by group.
| Template mark | Set from |
|---|---|
| Gap line | Pocket top |
| Side edge | Pocket center line |
| Top edge | Collar seam |
Record every shirt you finish. Note the size group and the gap used. A short list saves you the next time a new hire arrives.
Personal Patches on Shared Shirts: Names That Rotate
Shared shirts change wearers. A sewn hook panel lets each name swap in. Each wearer keeps one name patch in a bag.
- Sew one panel per shirt
- Order one hook name per wearer
- Keep spare names in a bag
SIZE FIT
Sizing Embroidered Name Tags to Your Pocket Width
A patch wider than the pocket looks heavy. Measure the pocket first. Then leave a margin on each side.
| Pocket width | Patch width | Margin |
|---|---|---|
| About 4 in | 3 to 3.5 in | 1/4 in each side |
| About 5 in | 4 in | 1/2 in each side |
| No pocket | 4 in common | Clear of the placket |
Long names tempt people to shrink the letters. Small letters blur at a distance. A wider patch reads better than tiny type.
- Longer names need a wider patch
- Keep letters large enough to read
- Use contrast thread on dark twill
- Check the proof at actual size
Letter size matters too. Think about reading distance. A name should read at arm length. Names with many letters need a wider patch or smaller letters. Check how it reads at arm length. A 4 by 1 inch patch is a common size. Send us your pocket width. We show it on the free proof.
READY TO ORDER
Send Your Names and Shirt Photo for a Free Proof
Upload Artwork
Send any common file format.
Approve Your Proof
Free digital proof within 24 hours.
We Ship Worldwide
Standard 10 to 14 business days. Rush in 5.
Tell us the names and the pocket width.
No minimum. Free proof in 24 hours. Ships to 50+ countries.
COMMON QUESTIONS
Name Patch Placement Questions
Which side of a work shirt does a name patch go on?
Either side works. Many teams use the right. Others choose the left. Pick one side and keep every shirt the same, so the team looks even.
How far above the chest pocket should a name patch sit?
A gap of about 1/2 to 1 inch is a common starting point. Keep the patch clear of the pocket flap. Check the result on the body before you stitch.
Where does a name patch go on a shirt with no pocket?
Use the placket and the shoulder seam as guides. Mark a level line with chalk. Tape the patch on and check it in a mirror before you stitch.
Should a name patch be centered on the pocket or lined up with an edge?
Centered looks neat and reads as one unit with the pocket. Edge-aligned works too. Pick one style and use it on every shirt in the team.
Where does a flight suit name patch go?
Usually on the chest, often on a hook-and-loop panel. Your service and unit rules set the exact spot, so check your uniform manual.
Can a military name patch use hook-and-loop instead of stitches?
Only if your rulebook allows it. Some uniforms permit hook backing. Others require sewing. Ask your chain of command first.
What size name patch fits above a chest pocket?
Choose a patch narrower than the pocket. A 4 by 1 inch patch is common. Measure your pocket width before you order, and tell us the number.
Can embroidered name tags sit on a pocket flap?
Avoid it. The flap opens and bends the patch, and the edges lift. Sew the patch above the flap seam instead, with a small gap.
Should a name patch cross a collar or shoulder seam?
No. Seams lift edges and bend letters. Keep a thumb width clear of every seam. That includes the collar and shoulder.
What if my name patch looks crooked after I sew it?
Unpick only the crooked side. Re-pin with a ruler and stitch again. Check it on a hanger and then on the body, standing straight.
How do I place name patches on a team when the shirt sizes differ?
Measure from a fixed point such as the pocket top, not the hem. Make one paper template for each size group. Mark every shirt the same way.
KEEP EXPLORING