Biker Vest Patches: A Placement Guide for Every Panel
Map every zone, measure the panels, then order.
Biker vest patches look best when each has a planned spot. Map the zones. Measure the panels. Then order your made-to-order set with a free proof.
VEST MAP
The Vest Map: Seven Patch Zones From Collar to Hem
A vest has seven patch zones. Each zone suits a different size. Plan them as one layout, not one patch at a time.
| Zone | Typical patch | Typical size |
|---|---|---|
| Back panel | Main piece and rockers | 10 to 12 in wide |
| Left chest | Name or small badge | 3 to 4 in |
| Right chest | Name or small badge | 3 to 4 in |
| Lower fronts | Event and rally patches | 4 in or less |
| Side panels | Narrow strips and flags | Slim strips |
| Collar | Pins and tiny badges | Small |
| Shoulders | Small flags and badges | Small |
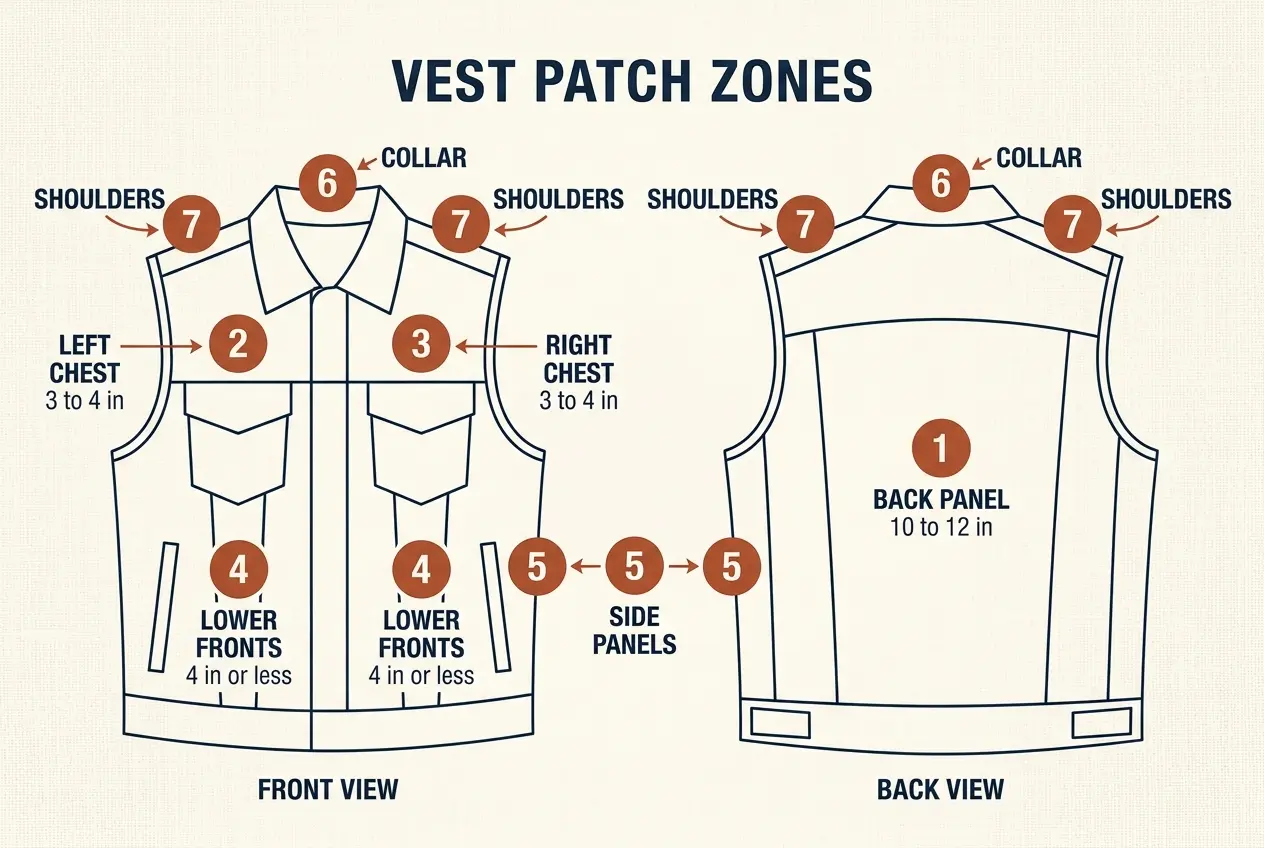
Draw this map on paper first. Then pick one patch for each zone.
Use this guide in order. Start with the map. Then measure. Then test fit. Order last.
- Collar seam
- Where the collar joins the back panel.
- Midline
- The center line from collar to hem.
- Hem
- The bottom edge of the vest.
- Panel
- One flat section, front or back.
- Usable area
- Space free of seams, snaps and straps.
- Pick one focal patch per panel.
- Match sizes in matching zones.
- Leave open leather between patches.
- Plan room for future patches.
A vest or cut has no sleeves. Sleeve zones do not apply. Sleeved garments need a different plan, so see the jacket patch page.
BACK PANEL
Back Patches for Biker Vest Panels: Collar, Midline and Hem
The back panel is the biggest canvas on your vest. The main piece sits here. Rockers frame it above and below.
- Mark the collar seam first.
- Set the top piece just below it.
- Center the main piece on the midline.
- Seat the bottom piece above the hem.
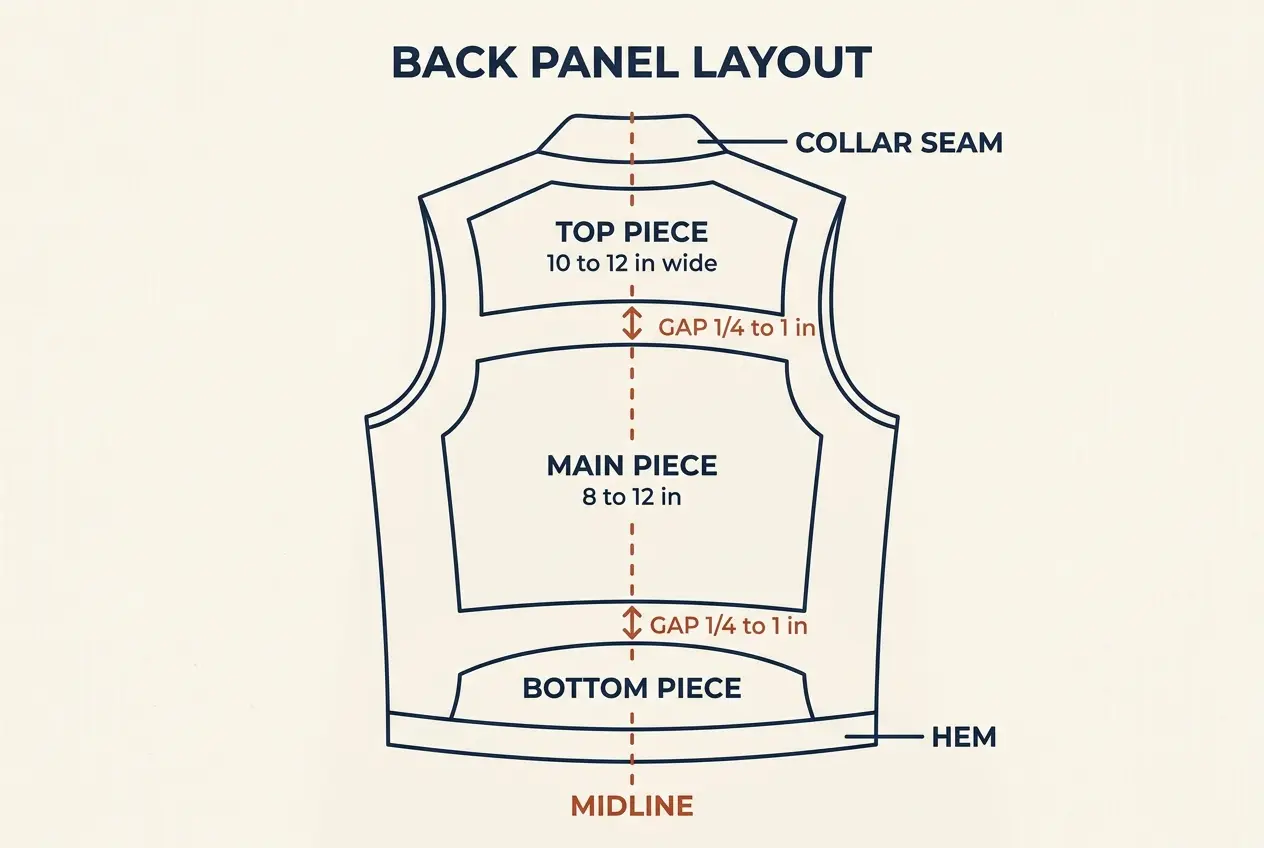
Typically the top piece sits right under the collar seam. The bottom piece sits close to the hem. Gaps stay even between all pieces.
| Piece | Typical size | Position |
|---|---|---|
| Top piece | 10 to 12 in wide, 2 to 3 in tall | Just below collar seam |
| Main piece | 8 to 12 in across | Center of the panel |
| Bottom piece | 10 to 12 in wide, 2 to 3 in tall | Just above the hem |
| Item | Height | Running total |
|---|---|---|
| Space under collar seam | 1 in | 1 in |
| Top piece | 3 in | 4 in |
| Gap | 1 in | 5 in |
| Main piece | 12 in | 17 in |
| Gap | 1 in | 18 in |
| Bottom piece | 3 in | 21 in |
| Space above hem | 3 in | 24 in |
This example uses made-up numbers to show the math. Swap in your own. Add everything up before you order.
These are common ranges, not rules. A narrow vest needs smaller pieces. A wide vest can take larger ones. Always measure your own panel first.
- Top piece leans left
- Main piece sits too low
- Gaps differ by an inch
- Top piece covers the seam
Where the Center Patch Sits on the Midline
Your main patch lives on the midline. Find that line before anything else. Back patches for biker vest builds go wrong when the line drifts.
Rockers follow the curve of the panel. They should look level when you wear the vest. Check them in a mirror.
- Fold the vest along the spine.
- Mark the line with chalk.
- Check it against the collar seam.
- Mark the same line at the hem.
Some vests have a seam across the upper back. Treat that seam as the top edge. Set the top piece below it.
Gaps Between Back Pieces: Typical Margins
Gaps frame the main piece. Even gaps look planned. Uneven gaps look like mistakes.
| Spot | Typical gap | Tip |
|---|---|---|
| Top piece to main piece | 1/4 to 1 in | Keep it equal |
| Main piece to bottom piece | 1/4 to 1 in | Match the top gap |
| Collar seam to top piece | Close, no overlap | Leave the seam clear |
| Bottom piece to hem | Close, no overlap | Leave the edge clear |
- Measure gaps with a ruler.
- Use the same gap twice.
- Adjust the smaller piece first.
Test the gaps on paper before you order. Paper costs nothing. A wrong gap on leather costs far more.
FRONT PANELS
Front Panel Placement: Chest, Pockets and Lower Fronts
Front panels are smaller than the back. Patches here stay small. Plan two or three first.
| Zone | Common use | Typical size |
|---|---|---|
| Left chest | Name or main badge | 3 to 4 in |
| Right chest | Support or small badge | 3 to 4 in |
| Pocket area | Small badges | 2 to 3 in |
| Lower fronts | Event and rally patches | 4 in or less |
- Measure from the collar seam down.
- Measure from the center zip or snaps out.
- Keep both chest patches the same height.
- Check the layout with the vest on.
Check the front in a mirror. Stand straight and look at both chests. They should read as a matched pair. Step back two paces and look again.
Left Chest and Right Chest: Where MC Vest Patches Usually Sit
Many riders put a name on one chest and a badge on the other. MC vest patches follow local customs, so ask before you place them.
Pros
- Small patches read well
- Easy to see in a mirror
- Room for a short name
Limits
- Seams run close
- Pocket edges crowd it
- Large art looks heavy
- Keep both chest patches level.
- Match the distance from the collar.
- Leave room for snaps or zippers.
- Pick one size for both.
Lower Fronts and Pocket Zones for Small Patches
Lower fronts collect event and rally patches over time. Leave room to add more.
- Start above the hem.
- Keep rows level.
- Space patches evenly.
- Group patches by theme.
- Leave one row open.
Pocket areas need care. Flaps open and close, so patches there should sit flat. Place them beside the pocket opening, not across it.
| Mistake | Result | Fix |
|---|---|---|
| Patches too large | Front looks crowded | Use 3 to 4 in |
| Rows uneven | Layout looks messy | Use a ruler |
| Patch across pocket | Flap will not open | Move beside it |
| No open space | No room to add | Leave one row |
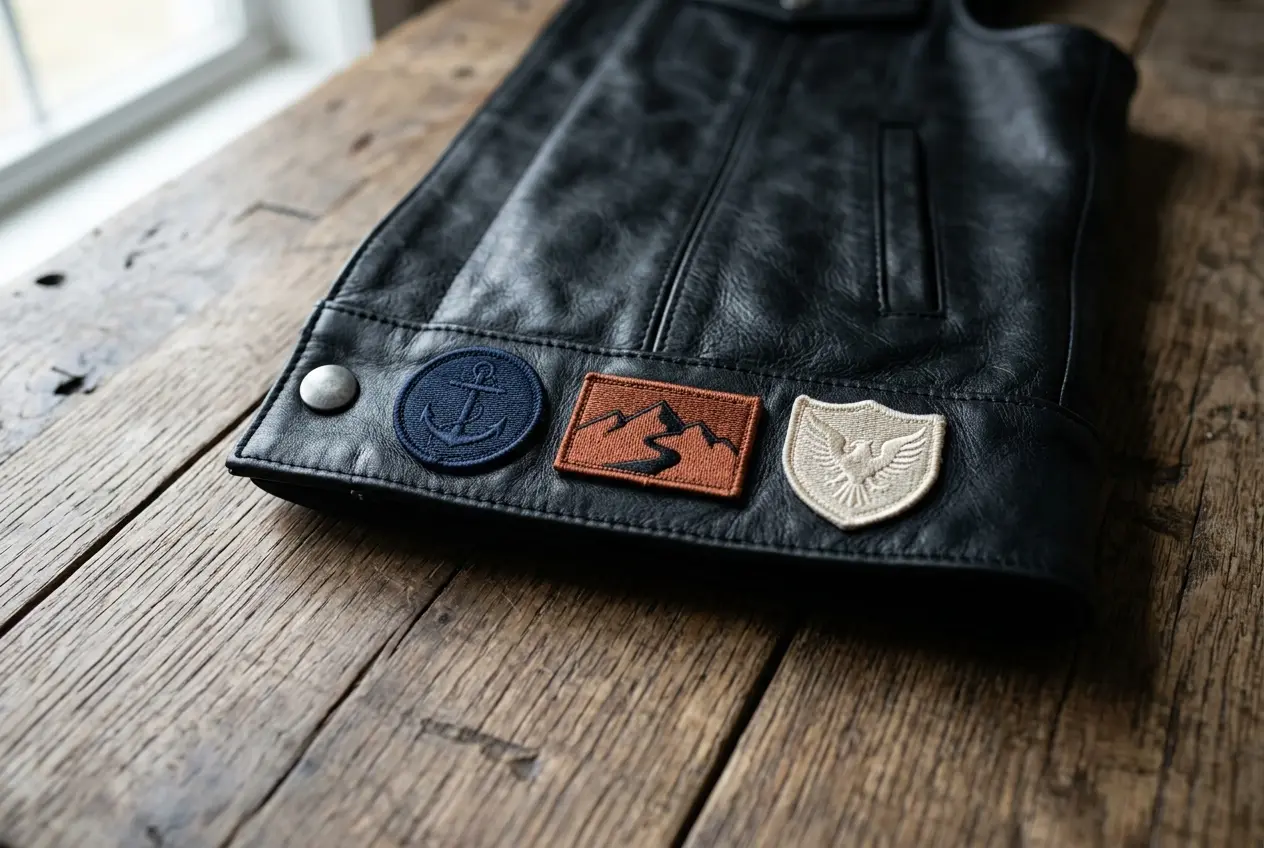
SMALL ZONES
Collar, Side Panel and Shoulder Zones for Small Patches
Narrow zones take small art. Big patches look cramped here. Strips and badges work best.
Fits tiny badges only. Keep it flat and light.
Fits small flags and badges. Stay off the seam line.
Fits narrow vertical strips. Check the side straps first.
Fits one small badge. Keep it clear of the hem.
- Pick strips with a clean edge.
- Short words read best.
- One idea per patch.
- Skip fine print at small sizes.
Zones this small leave no room for error. A badge that sits half an inch off looks wrong. Mark every corner.
Small patches need bold shapes. Thin letters vanish at small sizes. Ask for simple art.
| Badge type | Best zone | Tip |
|---|---|---|
| Flag patch | Shoulder | Keep the edge straight |
| Narrow strip | Side panel | Run it vertical |
| Initials badge | Collar | Use two or three letters |
| Round badge | Shoulder or collar | Keep art simple |
- Bold shapes read from far away.
- Two or three letters fit best.
- Thin lines disappear.
- High contrast helps.
Group small badges by theme. A tidy cluster looks planned. A scatter looks random.
Want removable badges for these zones? See our hook and loop options.
NO-GO ZONES
Zones to Leave Empty: Seams, Snaps, Pockets and Armholes
Some spots cause trouble. Patches there bulge, lift or wear fast. Leave them clear.
- Seams, where layers stack up
- Snaps and buckles
- Zipper tracks
- Pocket openings
- Armhole edges
- Side adjuster straps
| Spot | What goes wrong | Do instead |
|---|---|---|
| Seam | Patch bulges | Sit beside it |
| Snap or buckle | Needle blocked | Leave a clear gap |
| Zipper track | Patch snags | Stop short of it |
| Pocket opening | Pocket will not open | Place beside it |
| Armhole edge | Edge flexes and pulls | Move inward |
| Adjuster strap | Strap cannot move | Keep it clear |
Pros
- Flat leather takes stitches well
- Open panels stay level
- Even surfaces look clean
Limits
- Seams make patches bulge
- Snaps block the needle
- Armholes flex and pull
- Lay the vest flat.
- Mark every seam, snap and strap with chalk.
- Note the open areas between marks.
- Place templates only inside those areas.
Rivets and studs block stitching too. Treat them like snaps. Keep patches clear of them.
Stiff patches suffer most near folds. Place large pieces on flat areas only. Put small badges near the edges.
MEASURE FIRST
Motorcycle Vest Back Patches: Measure the Panel First
Motorcycle vest back patches need room to sit flat. A size that fits on a table can crowd a curved back. Measure before you design.
- Soft tape measure
- Chalk or washable marker
- Paper and scissors
- Low-tack painter's tape
- Lay the vest flat
Face down, with seams and hardware in view.
- Measure usable width
Check the collar point, where panels run narrow.
- Measure usable height
Go from collar seam to hem.
- Subtract your gaps
Leave margin on every side.
- Test with paper
Cut a template and tape it on.
Example only: your panel is 16 inches wide at the collar point. Leave 2 inches each side. That leaves 12 inches for the patch.
| Format | Shape | Best fit |
|---|---|---|
| 12 x 12 in | Square | Wide panels |
| 11 x 12 in | Near square | Tall artwork |
| 10 x 10 in or 9 x 9 in | Square | Narrower vests |
| 12 x 8 in or 11 x 7 in | Horizontal | Shoulder to shoulder |
| 8 x 10 in | Vertical | Narrow or shaped panels |
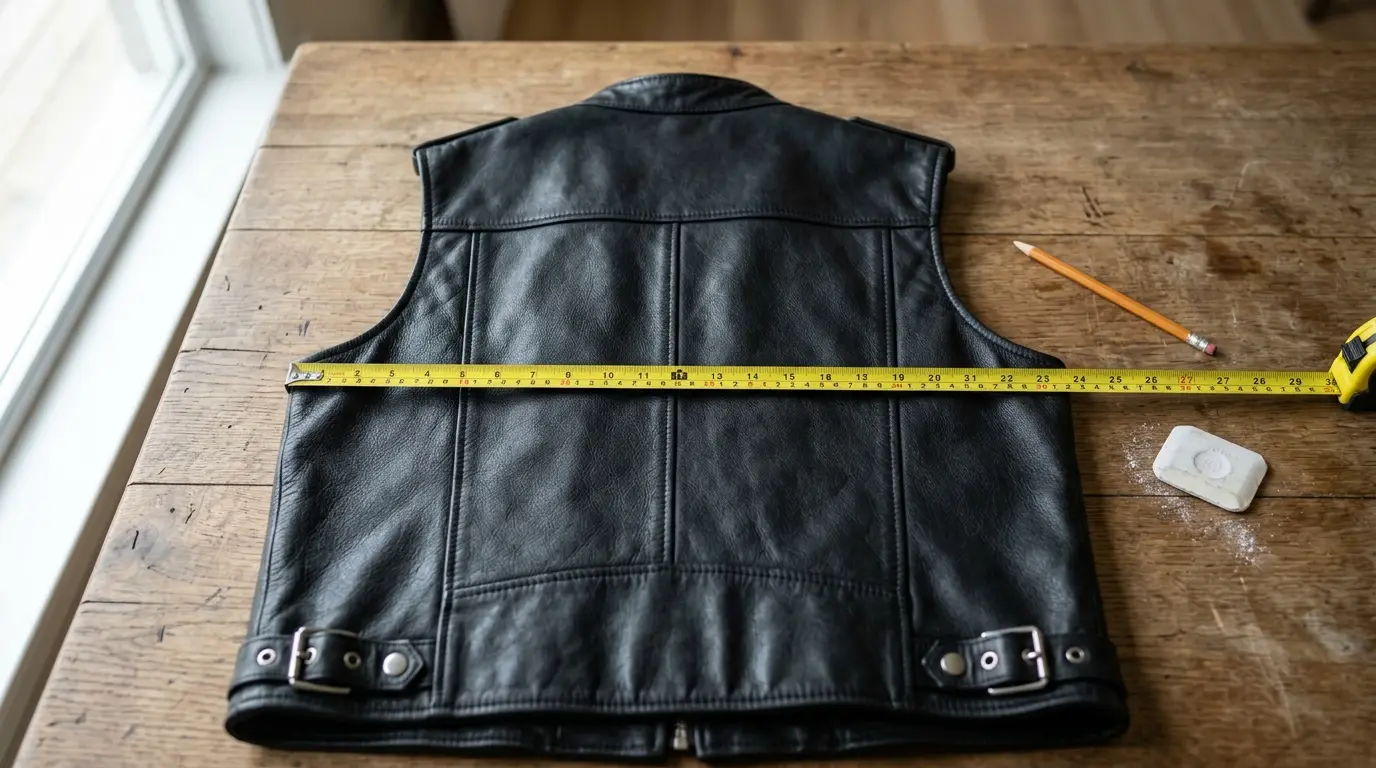
- Write every number down.
- Measure twice.
- Use inches or centimeters, not both.
- Note any seam or pocket inside the panel.
Send these numbers with your artwork. Check the size on your free digital proof.
SAMPLE LAYOUTS
Motorcycle Club Vest Patches and Solo Layouts: Four Samples
Patch count shapes the layout. These four samples show how to scale it. Motorcycle club vest patches follow club rules. Sets and rockers get their own page: three-piece sets and rockers.
One main back patch. One name patch on the chest. Lots of open space. Easy to expand later.
Back patch with a top and bottom strip. Matching chest badges. Same size on both sides.
One memorial patch on the chest. Keep the back clean. The patch stays easy to see.
Small patches on the lower fronts. Add rows each season. Keep every row level.
| Layout | Patch count | Open space |
|---|---|---|
| Solo rider | 2 to 3 | High |
| Small group | 4 to 6 | Medium |
| Memorial vest | 2 to 4 | High |
| Event collector | 6 or more | Low |
| Layout | Back | Chest | Lower fronts |
|---|---|---|---|
| Solo rider | One main patch | Name patch | Empty |
| Small group | Main plus two strips | Matching badges | Empty |
| Memorial vest | Clean back | Memorial patch | Empty |
| Event collector | One main patch | Name patch | Rows of badges |
- Start with fewer patches.
- Add small ones later.
- Keep one clear focal patch.
Pros
- Few patches look clean
- Each patch stands out
- Room to grow stays open
Limits
- Fewer stories on the vest
- Large gaps can look bare
Pick the sample closest to your plan. Then adjust it to your panel size.
TEST-FIT
Test-Fit Before You Stitch: Marking Positions on Leather and Denim
Leather keeps every needle hole. Denim forgives more, but marks still show. Test fit first and stitch last.
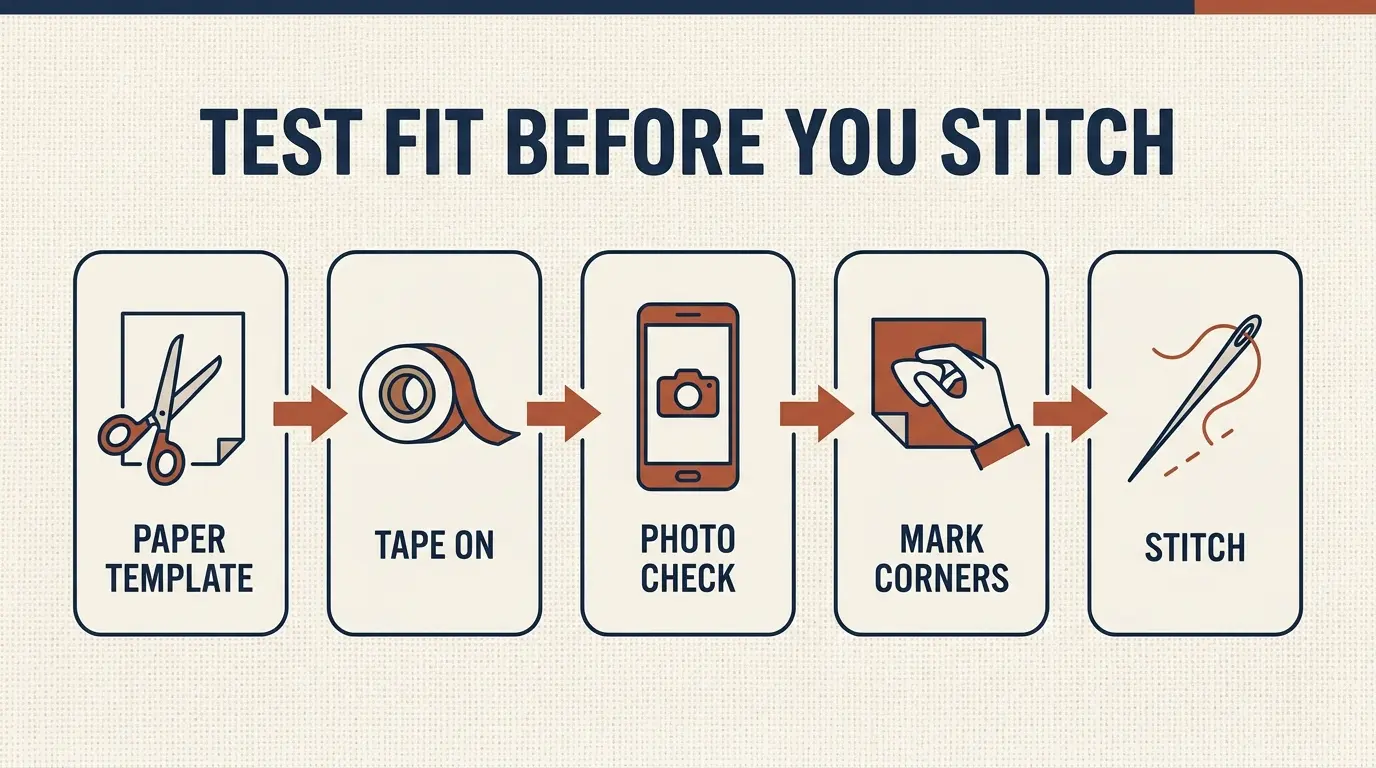
- Cut a paper template for each patch.
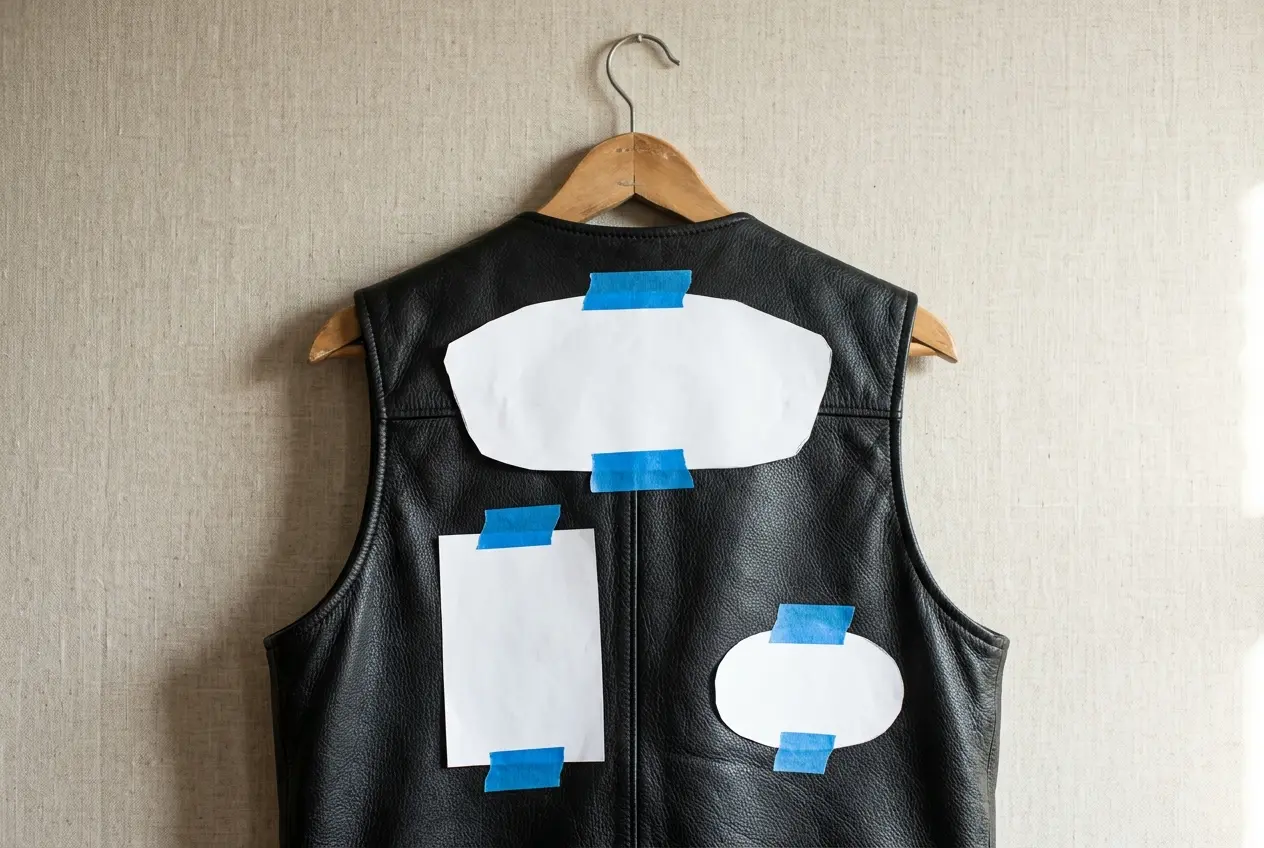
- Tape templates on with low-tack tape.
- Hang the vest and step back.
- Take a photo from behind.
- Mark corners with chalk.
- Remove templates, then stitch.
- Lines look level.
- Gaps look even.
- Weight looks balanced.
- Nothing sits on a seam.
Sew the main piece first. Then add the top and bottom pieces. Check the gaps after each piece. For stitch types, see the sewing guide.
Live with the layout for a day. Wear the vest around the house. Fix anything that bothers you before the first stitch.
| Surface | Test-fit tip | Attachment note |
|---|---|---|
| Leather | Tape only, no pins | Sew-on is typical |
| Denim | Pins are fine | Sew-on or iron-on |
| Thick leather | Mark with chalk | Stitch holes stay |
| Washed denim | Check for stretch | Stitch edges well |
Sewing is the usual choice on leather. Heat can harm leather, so skip the iron there. Read our sewing guide for stitches. Use the ironing steps for denim.
BEFORE ORDERING
What to Send With Your Vest Layout Before Ordering
A clear brief gets a clear proof. Send what you measured.
Unsure about size? Use the free revisions to compare options. Check each one against your paper template.
- Panel width and height
- Zone for each patch
- Wording for each patch
- Colors you want
- Artwork file or sketch
- Quantity for each patch
Name each zone the same way every time. Say back panel, left chest, right chest, lower front. Clear names stop mix-ups.
| Zone | Size | Wording |
|---|---|---|
| Main back piece | 11 x 12 in | Your artwork |
| Top piece | 12 x 3 in | Short name |
| Left chest | 3 x 3 in | First name |
| Lower front | 2 x 3 in | Event name |
We accept AI, EPS and PDF files, plus PNG and JPG. Share your biker vest patches layout as the brief.
Full back sets live on our biker patch page. Jacket backs sit on the jacket patch page. See leather patch options too.
READY TO ORDER
Send Your Vest Layout for a Free Proof
Upload Artwork
Send any common file format.
Approve Your Proof
Free digital proof within 24 hours.
We Ship Worldwide
Standard 10 to 14 business days. Rush in 5.
Send your layout and artwork. Get a free digital proof in 24 hours.
No minimum. Free proof in 24 hours. Ships to 50+ countries.
COMMON QUESTIONS
Questions Riders Ask About Placing Patches on a Vest
Where do patches go on the back of a biker vest?
Put the main patch on the midline. Place a top piece under the collar seam. Place a bottom piece above the hem. Keep gaps even. Back patches for biker vest panels look best balanced.
How do I find the exact center of a vest back?
Lay the vest flat and measure the width at the armholes. Divide by two and mark that point. Repeat at the collar and the hem. Join the marks with chalk.
How much empty vest should show between patches?
Typically about 1/4 to 1 inch. Keep every gap equal. Equal gaps look planned. Check the numbers against your panel and patch size.
Which side of a riding vest does a name patch go on?
Conventions vary by club and region. Many riders choose a chest. Ask your club before you place anything, then keep both chest patches level.
Can I put a patch over a vest seam?
Avoid it. Seams stack layers, so the patch bulges and stitching struggles. Place the patch beside the seam with a small gap instead.
How many patches fit on the front of a vest?
Two or three small patches fit most fronts. The count depends on panel width. Leave open space, then add more later as you collect them.
Where do small rally and event patches go on a vest?
Lower fronts and side panels are the usual spots. Start above the hem. Keep rows level and leave room for new patches.
Where should a memorial patch sit on a riding vest?
Many riders choose the chest near the heart. No single rule applies. Pick a spot you can see. MC vest patches vary by club, so ask first.
Why does a big back patch bulge near the shoulders?
Panels narrow and curve toward the shoulders, but a stiff patch stays flat. Measure width at the collar point. Motorcycle vest back patches need margin to sit flat.
How do I test patch positions without making holes in leather?
Cut paper templates. Tape them on with low-tack painter's tape. Hang the vest, step back and photograph it. Move templates until it looks right.
What should I send with my artwork for a vest patch?
Send panel width and height, the zone for each patch and any wording. Check the size on your free digital proof before production.
Should patches on a riding vest match in size?
Match sizes in matching zones. Two chest patches should be the same size and height. Back pieces can differ. Keep their gaps equal so the layout reads as one planned set.
How do I leave room for patches I do not own yet?
Keep one open row on the lower fronts. Leave open leather beside the main back piece. Mark the open areas on your paper map. Then no new patch lands on a seam.
Do you make Harley patches for vest layouts?
We make custom patches from your own artwork. We do not make licensed brand logo patches. Send your design and get a free proof.
KEEP EXPLORING