Patch on Denim Jacket: Ideas and Layout
Map the zones, pick a layout, then design your own piece.
A jean jacket with patches looks planned or messy, and layout decides which. Map each zone, then design one custom piece to fit.
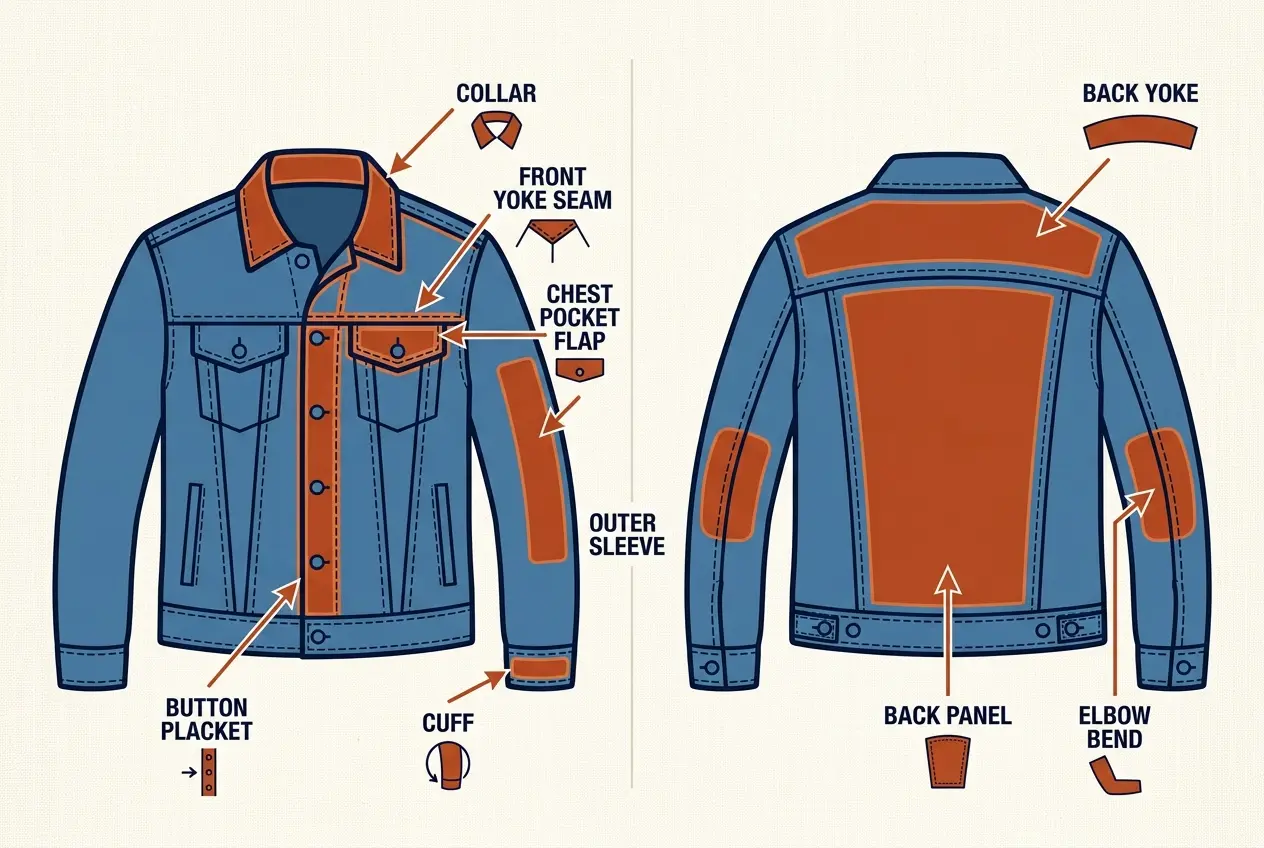
JACKET ZONES
Map Your Denim Jacket Before You Choose Patches
Every denim jacket has fixed lines. Seams, flaps and buttons decide where a patch can sit. Learn those lines first. Press a patch on denim jacket seams and the edges lift.
| Zone | What it allows | Watch for |
|---|---|---|
| Back panel | One big piece or a cluster | Yoke seam at the top |
| Back yoke | Narrow strip only | Seam ridge under the patch |
| Chest pockets | Small patch above | Flap must still open |
| Button placket | Nothing on top | Buttons and buttonholes |
| Sleeves | Rows or small rounds | Elbow bend |
| Cuffs | Tiny accent | Thick seams |
| Collar | One small patch | Stiff, curved fabric |
- Back: your biggest flat space
- Front: two pockets and a placket
- Sleeves: long and narrow
- Seams: thick, so edges lift
- Collar and cuffs: small accents only
- Yoke
- The panel across the upper back.
- Placket
- The strip that holds the buttons.
- Flap
- The cover over a chest pocket.
Denim is a tough cotton twill. It holds stitches well. Thick seams are the weak point for flat patches. A classic trucker jacket has flapped chest pockets and front seams.
Cropped and oversized cuts change the space. A short jacket has less back height. A boxy one has more width. Measure yours before you plan.
| Jacket cut | Space effect | Layout tip |
|---|---|---|
| Classic trucker | Medium back, two flaps | Back statement works |
| Cropped | Short back height | Choose a wide, low piece |
| Oversized | Wide back, long sleeves | Room for a cluster |
| Lined or heavy | Stiffer fabric | Stitch borders fully |
- Measure the back width and height
- Measure the sleeve length
- Note the pocket size
- Photograph front, back and sleeves
LAYOUT STYLES
Six Layout Styles for a Jean Jacket With Patches
Pick the style first. Then choose patches to fit it. Doing it backward leads to clutter.
One big piece owns the back. Everything else stays plain.
A large back piece, then two or three small ones up front.
Narrow strips run down the outer sleeve. Clean and linear.
Three to five small patches grouped above one pocket.
Back, front and sleeves all filled. It needs a strict color plan.
One patch low on the left, one high on the right. Space does the work.
| Style | Patches | Effort | Best for |
|---|---|---|---|
| Statement back | 1 | Low | A first jacket |
| Back plus accents | 3 to 5 | Medium | Daily wear |
| Sleeve rows | 2 to 4 | Medium | Clean, linear looks |
| Chest cluster | 3 to 5 | Medium | Small collections |
| Full collage | 10 or more | High | Showpiece jackets |
| Quiet asymmetry | 2 to 3 | Low | Minimal style |
Ask what people should see first. Pick the style that answers it. A bold back says loud. A quiet front says subtle.
- How many patches do you want to wear?
- Do you want one clear focal point?
- Will you wear the jacket every day?
- Do you want it loud or quiet?
| If you want | Choose |
|---|---|
| One bold focal point | Statement back |
| A collected, personal look | Full collage |
| A clean, tidy look | Sleeve rows |
| Easy daily wear | Back plus accents |
Styles can blend. A statement back works with sleeve rows. Avoid mixing three styles at once. The jacket will look undecided.
- Do not fill every zone
- Do not blend more than two styles
- Do not use five equal sizes
- Do not skip the paper test
BACK PANEL
Jean Jacket Back Patch: Height, Centering and the Yoke Seam
The back is your biggest flat space. Many denim jackets have a yoke seam across the upper back. It makes a thick ridge under the fabric.
Height matters. Too high, and the piece rides into the collar. Too low, and it hits the waistband. Some jackets add waist tabs or side adjusters. Keep patches clear of them.
- Button the jacket and lay it flat.
- Fold it in half down the back center.
- Press a light crease as your center line.
- Mark the top edge below the collar.
- Keep patch edges off the yoke seam.
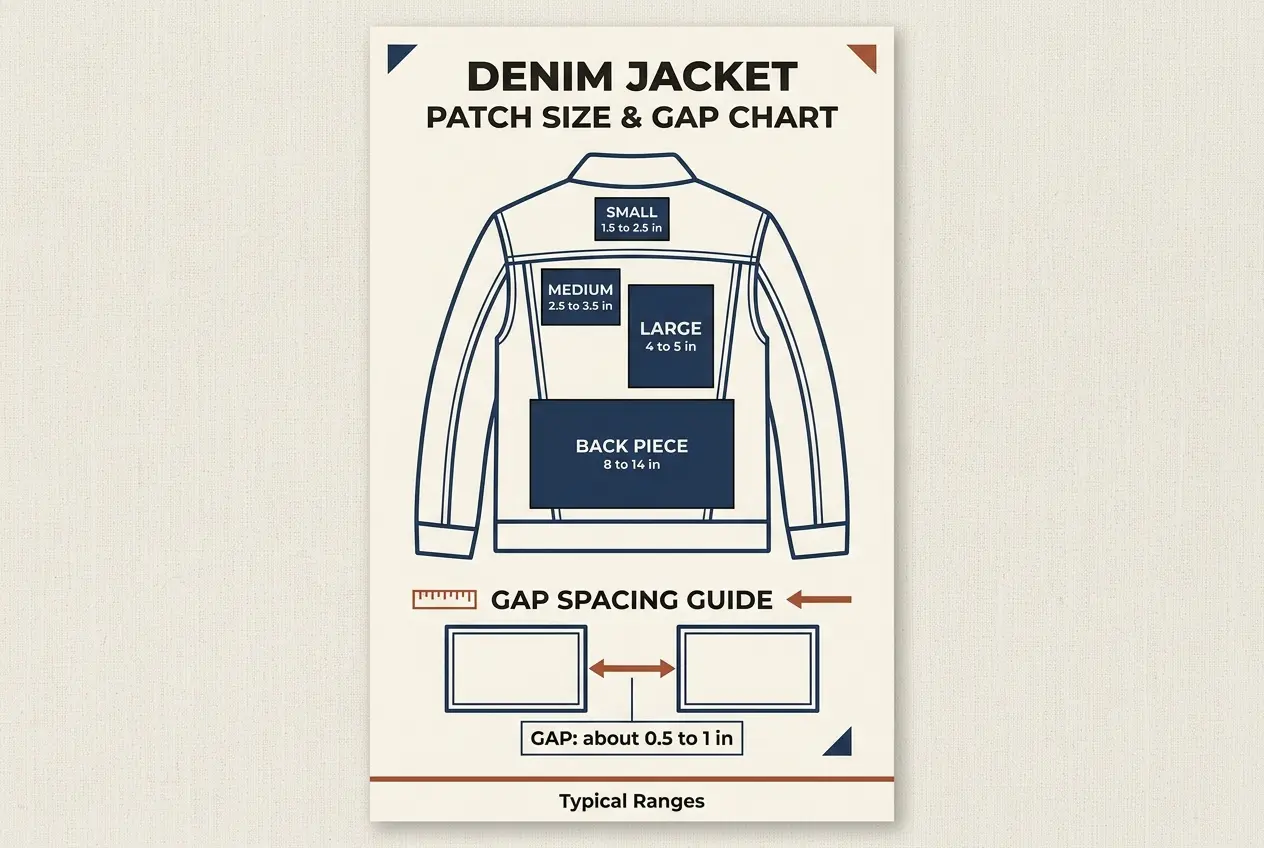
| Size class | Typical width | Best use |
|---|---|---|
| Cluster piece | 4 to 5 in | Back with several pieces |
| Large piece | 8 to 14 in | Single statement |
| Extra-large piece | 12 to 16 in | Full panel statement |
| Lower strip | Long and thin | Above the waistband |
- Single piece: one hero, centered
- Arch above, strip below
- Center piece with two small flankers
- Top band plus a lower row
| Mistake | Fix |
|---|---|
| Patch sits too high | Drop it below the collar |
| Patch sits crooked | Use a center crease |
| Edge on the yoke seam | Shift it clear of the seam |
| Piece too big | Order a smaller size |
| No margin | Leave space on every side |
Measure first. Take the width between the shoulder seams. Then take the height from collar to waistband. Subtract a margin on every side.
Planning a rocker layout? See the biker vest guide. Sizes for other jackets sit on our jacket patch page.
Large Back Patches for Denim Jackets: Weight and Seam Rules
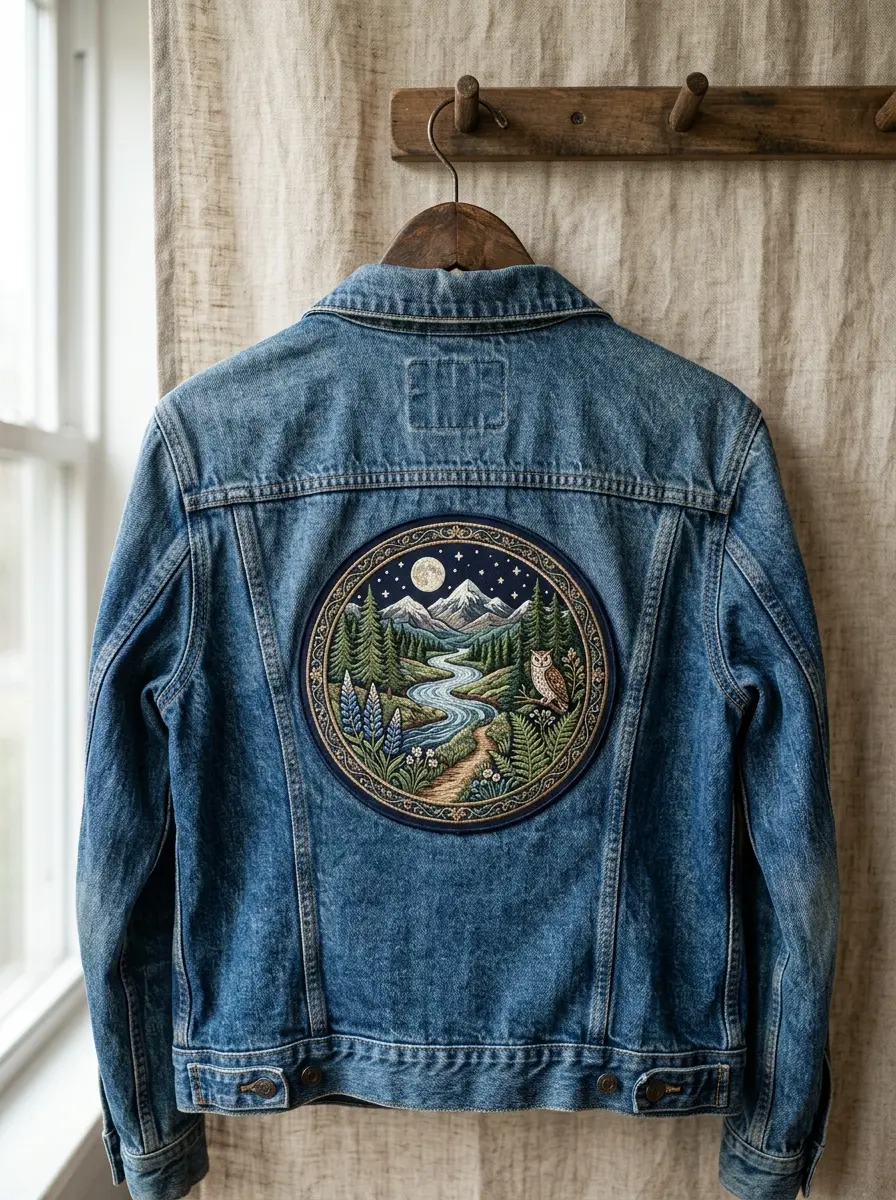
A large piece is stiff and heavy. It changes how the jacket hangs. Keep it flat and fully stitched.
- Pin the piece, then hang the jacket
- Check that the collar does not tug
- Stitch the full border, not just corners
- Keep edges off thick seams
- Pick sew-on for the heaviest pieces
Weight shows on the hanger. A heavy piece can drag the collar back. Wear the jacket for a minute before final stitching.
Many makers stitch the border even after heat bonding. Read our sewing guide or the ironing steps.
FRONT PANELS
Chest, Pockets and Placket: Keep the Front Light
The front is for small patches. Big pieces fight with buttons and flaps. Let the back do the talking.
| Front spot | Fit | Rule |
|---|---|---|
| Above chest pocket | One small patch | Leave a small gap |
| Pocket flap | One tiny patch | Flap must still close |
| Left chest | One small piece | Keep it level |
| Button placket | None | Buttons and holes |
| Below the pockets | Narrow strip | Stay off the waistband seam |
- Keep every buttonhole clear
- Leave pocket openings free
- Choose one small patch per side
- Match left and right in weight
A patch on a pocket changes the pocket. Decide if you still need it. If yes, stitch above the flap instead.
- Round emblems
- Small shields
- Letters or initials
- Tiny icons
- Narrow bars
Those shapes suit the chest well. They stay readable at a small size. Pick two, not five.
One small round above the left pocket. Quiet and tidy.
One patch above each pocket. Same size, same height.
Three small pieces grouped over one pocket. Keep gaps even.
Adding a name? See the name patch placement guide.
SLEEVE LAYOUT
Sleeves, Shoulders and Cuffs: Rows and Upper-Arm Rounds
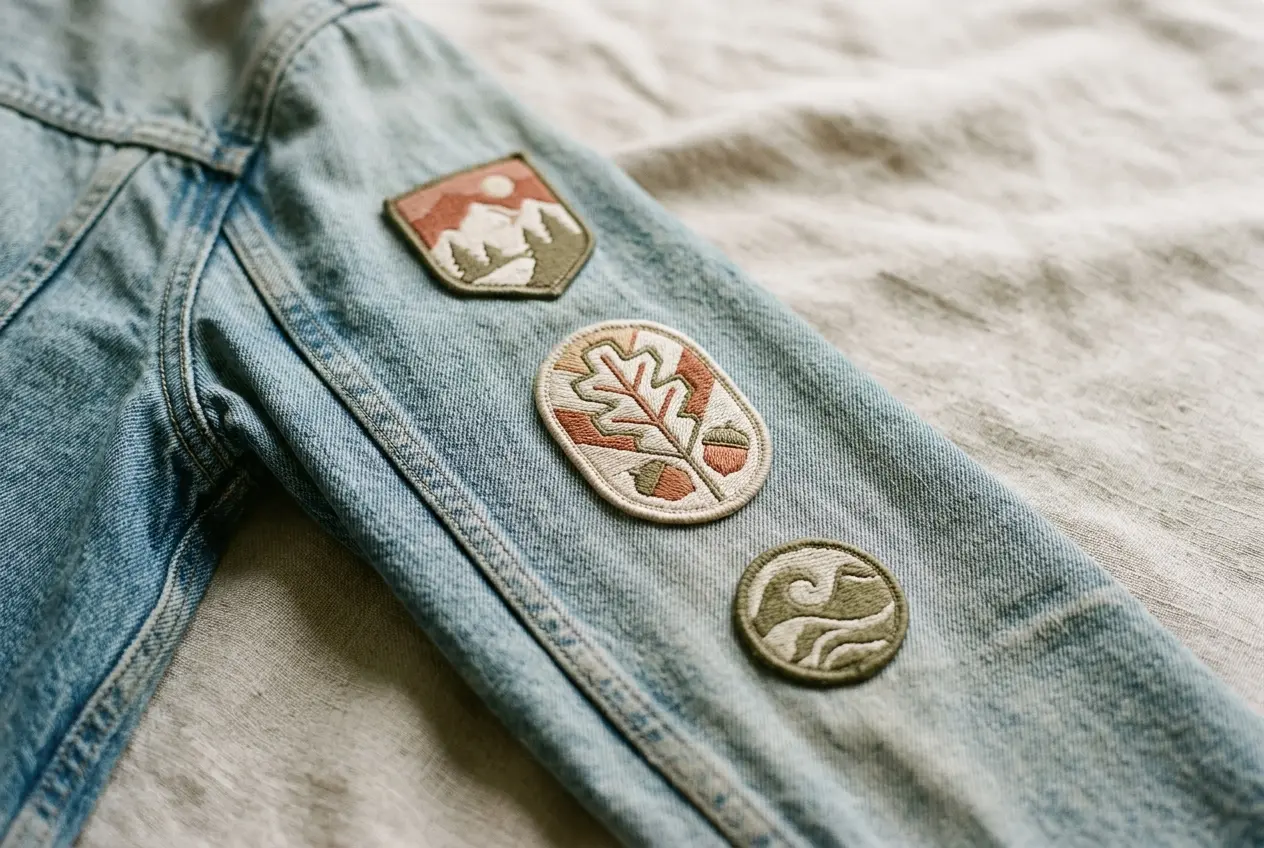
Sleeves are long and narrow. Long strips follow that line. Small rounds fit the upper arm.
The shoulder seam runs over the top of the arm. A patch just below it sits flat. Do not cross the seam.
- Run strips along the outer sleeve
- Keep one round on the upper arm
- Stay off the sleeve seam
- Bend your arm before stitching
- Keep cuffs nearly bare
| Spot | Shape | Typical size |
|---|---|---|
| Upper arm | Small round | 1.5 to 2.5 in |
| Outer sleeve | Narrow strip | Runs with the seam |
| Cuff | Tiny accent | Mind the thick seam |
- Pick the sleeve line on the outer arm.
- Space small pieces evenly along it.
- Bend the arm and check every piece.
- Match the other sleeve or leave it bare.
A matched sleeve pair looks formal. One busy sleeve looks playful. Both work if you choose on purpose.
Denim Jacket Elbow Patches: Repair Look or Style Detail
Denim jacket elbow patches borrow from classic repair looks. Today they work as pure style. They sit on the bend, so they move a lot.
Center the patch on the point of the elbow. Bend your arm. Mark the spot with chalk.
- Use a full stitched border
- Match left and right sleeves
- Keep the shape rounded
- Choose a flexible patch
Pros
- Adds a classic repair look
- Balances a busy back
- Works as a matched pair
Limits
- Moves with every bend
- Edges lift if glued only
- Adds a stiff spot
DENIM VESTS
Denim Vest for Patches: A Wider Canvas With No Sleeves
A vest gives you a clean back and no sleeve bend. Armholes add new edges to avoid.
| Trait | Jacket | Vest |
|---|---|---|
| Sleeve bend | Yes | None |
| Sleeve patches | Yes | No |
| Edge to avoid | Cuffs | Armholes |
| Layering | Worn alone | Over a hoodie |
- Hero piece centered on the back
- Narrow strip above the hem
- Two small pieces on the chest
- Nothing on the front edges
- Keep patches off armhole edges
- Plan for hoodie bulk underneath
- Use the back as your statement
- Put small pieces on the front panels
A vest shows more of what you wear under it. A plain tee keeps the layout clean. A busy print competes with your patches.
Vest backs often suit one hero piece. Add a narrow strip above the hem. That gives a finished, balanced look.
Pros
- No sleeve bend to plan around
- Clean, open back panel
- Easy to layer over hoodies
Limits
- Armholes add edges to avoid
- Less total patch space
- Shows what you wear under it
FADED DENIM
Vintage Denim Jacket Patches: Match Faded Washes and Worn Edges
A faded wash has soft indigo and pale seams. Loud colors can fight it. Muted thread tones sit quietly on it.
| Denim wash | Thread tones | Look |
|---|---|---|
| Dark indigo | Cream, rust, mustard | Strong contrast |
| Mid blue | Navy, cream, tan | Soft match |
| Pale stonewash | Brick, olive, charcoal | Grounded |
| Black denim | White, gray, red | Sharp |
| Light wash | Navy, forest, gold | Rich pop |
Pair warm thread with cool denim. Rust and cream pop on blue. Olive and tan sit calm.
- Choose two or three main colors
- Add one pop color only
- Pick muted shades for aged looks
- Compare the proof with a jacket photo
Aged looks come from color, not damage. Choose softer tones and calm contrast. View the colors in daylight, not under a lamp.
- Muted
- Softer tones with less saturation.
- Contrast
- How far thread color sits from denim.
- Wash
- The fade level of your denim.
You get a free Pantone-matched digital proof in 24 hours. Ask for changes until the colors sit right. Revisions are unlimited and free.
Our patches use polyester thread on a polyester twill base. The thread holds its color well beside faded denim.
LAYOUT PLAN
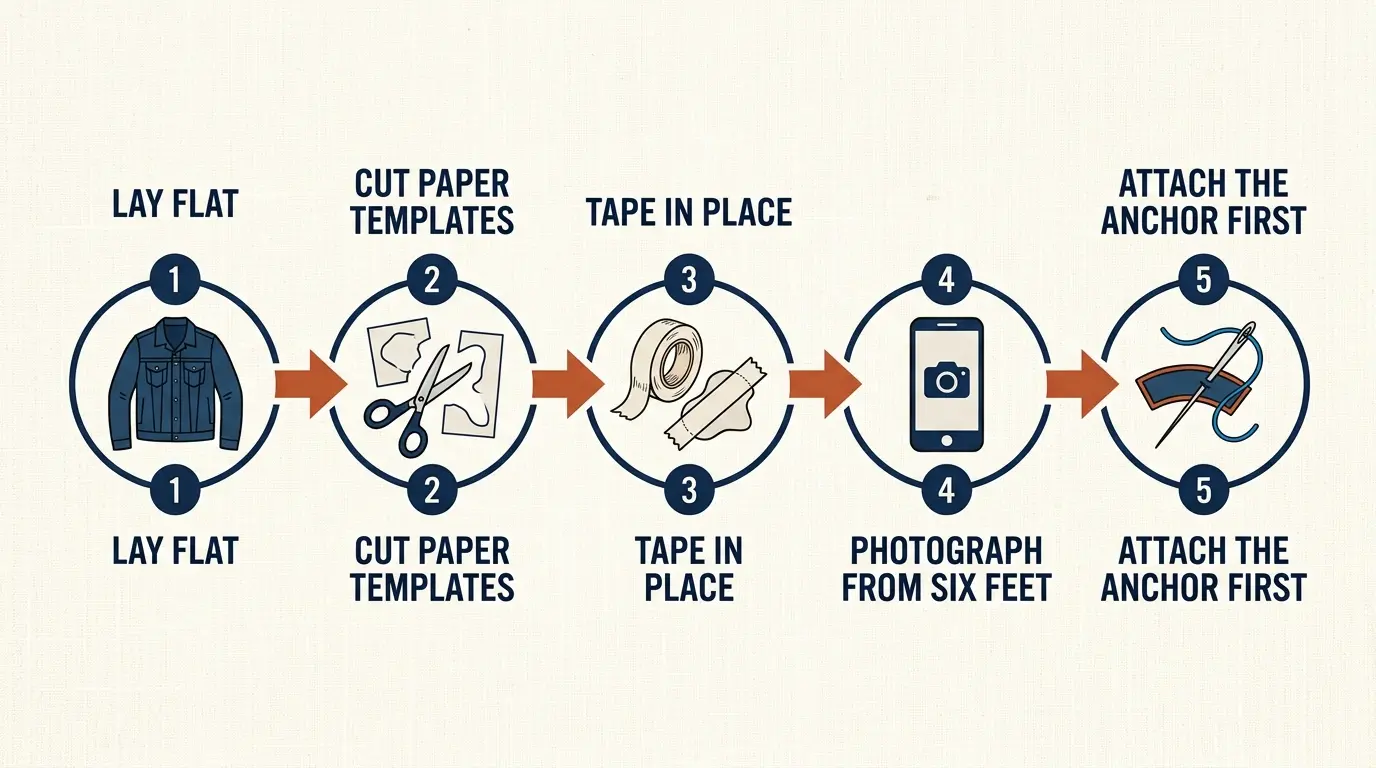
Plan the Layout on a Table in Five Steps
Planning takes ten minutes. It saves you from unpicking stitches later. Order patches for a jean jacket only after this test.
- Lay it flat
Button the jacket and smooth the back.
- Cut paper templates
Trace each patch size on paper.
- Tape them on
Use painter's tape so the denim stays clean.
- Photograph it
Look from six feet. Spacing errors show fast.
- Attach the anchor first
Fix the biggest piece first. Fill in around it.
Leave typically half an inch to one inch between pieces. Tight gaps look crowded.
- Paper and scissors
- Painter's tape
- A pencil or chalk
- A phone camera
- A hanger or mannequin
Hang the jacket after taping. Fabric falls differently on a hanger. Check the layout again.
| Common slip | Quick fix |
|---|---|
| Gaps too tight | Add half an inch |
| All patches equal size | Add a hero piece |
| Patch over a seam | Slide it sideways |
| Colors clash | Cut one shade |
MIX AND MATCH
Mix Sizes, Colors and Themes Without Clutter
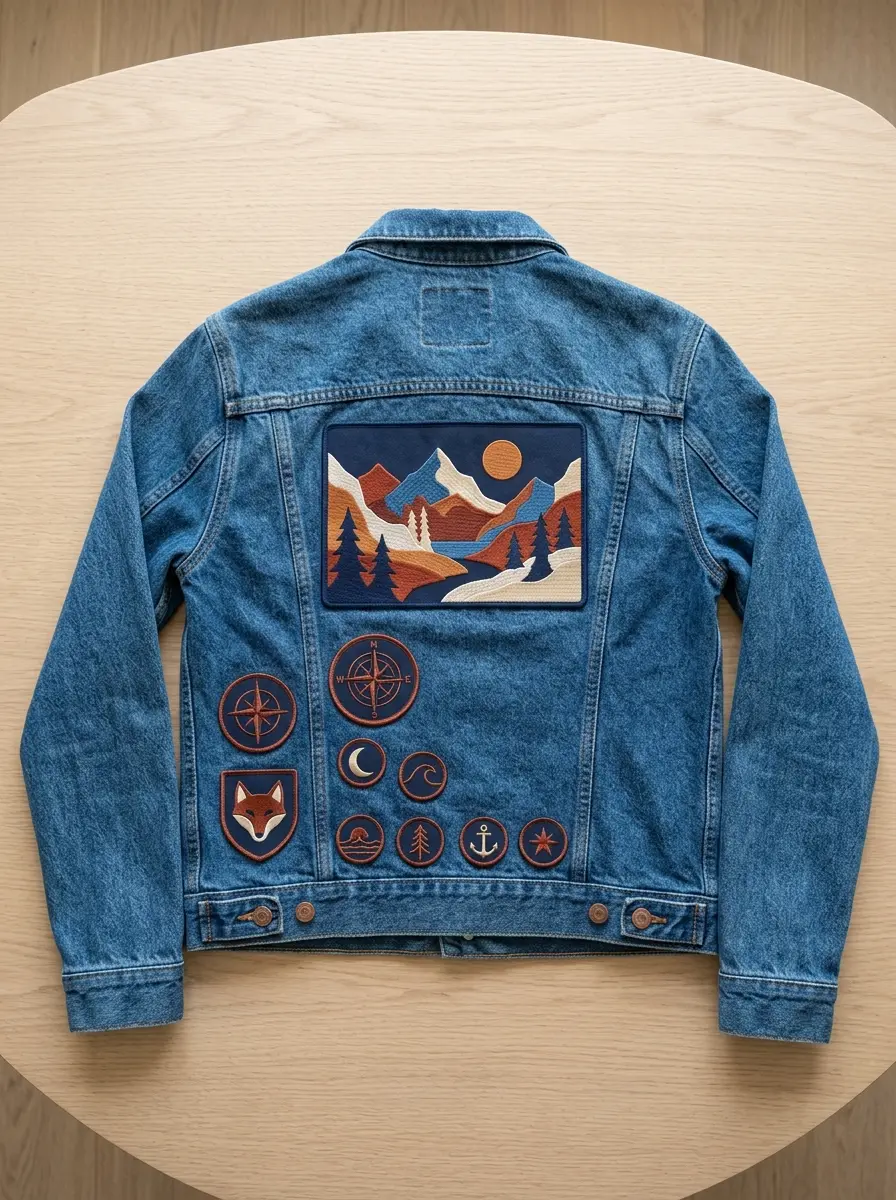
Every patch on denim jacket fabric has a job. It leads, supports or fills. A jean jacket with patches reads as one piece when the sizes step down.
- Hero
- The largest patch. One per jacket.
- Mid
- Medium pieces that echo the hero color.
- Filler
- Small patches that close the gaps.
- Repeat color
- One shade used in three places.
| Role | Relative size | How many |
|---|---|---|
| Hero | Largest | 1 |
| Mid | About half the hero | 2 to 3 |
| Filler | Smallest | 3 to 6 |
- Stay within three main colors
- Pick one theme, such as travel
- Repeat a shape, such as rounds
- Leave one zone bare
Color ties the jacket together. Repeat one shade on the back, the chest and the sleeve. The eye then reads a plan.
Maps, compasses and place names in warm earth tones.
Leaves, peaks and waves in green, blue and cream.
Tools, instruments or sports icons in two repeated colors.
Sparse or crowded? Both can work.
Pros
- Each patch gets noticed
- Easy to plan and balance
- Room to add later
Limits
- Less of a collected feel
- Bare areas can look unfinished
DIY OR CUSTOM
DIY Jean Jacket Patches or a Custom Piece Made to Your Layout
You can cut fabric scraps or hand stitch your own. That suits a loose, handmade style. A made-to-order piece gives exact shape and color.
| Trait | Homemade | Made to order |
|---|---|---|
| Exact shape | Hard by hand | Cut from your art |
| Matching a layout | Trial and error | Sized to your template |
| Fine detail | Limited | Stitched from your file |
| Color match | Fabric you have | Pantone-matched proof |
| Quantity | One at a time | 1 to 100,000 |
- Measure your space
Use the paper template from your layout.
- Draw it to scale
Sketch the shape and the colors.
- Send your art
AI, EPS, PDF, PNG and JPG all work.
- Approve the proof
Free digital proof in 24 hours.
Patches for a jean jacket can start at one piece. There is no minimum order. Need help drawing? Use the design guide.
- Measured width and height in inches
- Photo of the jacket back
- Colors you want matched
- Where each piece will sit
Add those notes to your order. They help us size each piece to your layout.
Not sure about embroidered or woven? See the material comparison.
Compare backings in the backing guide. Costs sit on the pricing page.
READY TO ORDER
Send Your Jacket Layout for a Free Proof
Upload Artwork
Send any common file format.
Approve Your Proof
Free digital proof within 24 hours.
We Ship Worldwide
Standard 10 to 14 business days. Rush in 5.
We make custom patches for a jean jacket in any shape you draw. Send your paper layout and a photo.
No minimum. Free proof in 24 hours. Ships to 50+ countries.
COMMON QUESTIONS
Jean Jacket Patch Questions
How many patches look good on a jean jacket?
A patch on denim jacket zones works best in small groups. Five to nine often looks balanced. Fewer feels clean. More needs a strict color plan and a clear hero piece. Count each zone, not the whole jacket.
Should a jean jacket back patch sit dead center?
Yes, in most layouts. Center it between the shoulder seams, not by eye. Drop it below the collar so it does not ride up. Keep its edges off the yoke seam. Test with paper first.
Should patches cover the chest pockets of a trucker jacket?
Only if you never use them. Small patches above the flap are safer. The flap stays free to close. A patch on the flap itself must stay tiny and flat.
What patch size works on a denim jacket sleeve?
Small rounds of about 1.5 to 2.5 inches suit the upper arm. Narrow strips suit the outer sleeve, running with the seam. These are typical ranges, so test a paper template on your own sleeve first.
What gap should I leave between jacket patches?
Typically half an inch to one inch. Test with paper templates and a photo. Tight gaps look crowded, and wide gaps look random. Keep the gaps even across a cluster so the group reads as one shape.
Do patches for faded denim need faded colors?
No. Muted tones blend with a faded wash. Bold colors make a sharper contrast. Both are valid choices. Check the free proof next to a jacket photo. Do it in daylight before you approve.
Is a denim vest easier to patch than a jacket?
Often, yes. A vest has no sleeve bend and no cuffs, so the layout is simpler. You still plan around armhole edges and seams. The back panel gives you a clean statement space.
Do elbow patches on a denim jacket need a special shape?
Ovals and rounded rectangles are common. Pick a shape that follows the bend, not a sharp point. Bend your arm and test a paper template first. Stitch the full border so the edges stay flat.
How do I plan a patch layout before I order?
Cut paper templates in each patch size. Tape them onto the flat jacket. Photograph it from six feet away, then hang the jacket and check again. Adjust until the sizes and gaps feel balanced.
What size should I order for a full jacket back?
Measure between the shoulder seams and below the collar to the waistband. Large back pieces typically run 8 to 14 inches wide. Subtract a margin on every side, then send us your measured space.
Can one custom piece replace a whole patch collage?
Yes. One large statement piece can carry the back alone. The rest of the jacket stays plain. It is stiff and heavy, so stitch the full border. Check how the collar hangs.
What should I send to match my jacket layout?
Send a photo of the jacket, your measured space and your artwork. AI, EPS and PDF files work best. Add notes on where each piece will sit. We reply with a free proof in 24 hours.
KEEP EXPLORING