Patches for a Backpack: Which Attachment Fits Your Bag
Match velcro, thread or heat to your bag fabric.
Putting a patch on backpack fabric fails when the method ignores the material. Match velcro, thread or heat to your bag first. Then order the patch.
FABRIC FIRST
Match the Attachment to Your Backpack Fabric
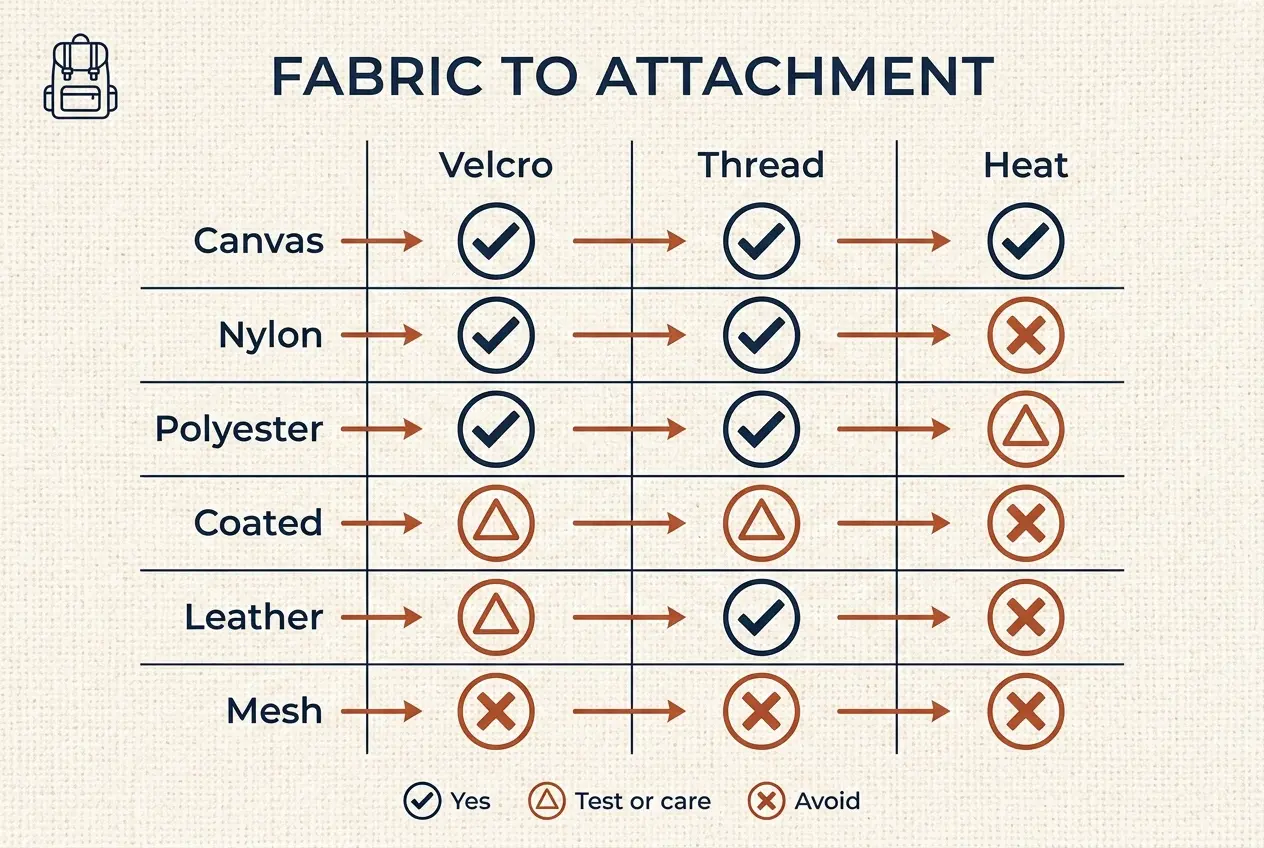
Fabric decides the method. Read the care tag on your bag first. Then pick from the table.
| Fabric | Velcro | Thread | Heat |
|---|---|---|---|
| Canvas or cotton duck | Yes | Yes | Yes, with cloth |
| Cordura-style nylon | Yes | Yes | No |
| Ripstop nylon | Yes | Yes | No |
| Plain polyester | Yes | Yes | Test first |
| PU-coated fabric | Sewn loop only | Careful | No |
| Leather | Sewn loop only | Yes, leather needle | No |
| Mesh or stretch | No | No | No |
- Canvas takes all three methods
- Nylon packs suit thread or hook and loop
- Coated fabric dislikes heat and needle holes
- Leather needs a sharp, heavy needle
- Mesh pockets cannot hold a patch
- Canvas
- Woven cotton or blend. Takes needle, hook and heat well.
- Cordura-style nylon
- Tough, abrasion-resistant nylon. Common on hiking packs.
- Ripstop nylon
- Light nylon with a grid of reinforcing threads.
- Polyester
- Common on school packs. Often coated inside.
- PU coating
- A plastic layer for water resistance. Heat and needles can damage it.
- Leather
- Thick hide. Needs a sharp needle and strong thread.
Not sure what you own? Check the care tag or the product page. Most listings name the fabric.
A patch on backpack canvas lasts for years. Nylon asks for more care. Check the fabric before you check the design.
- Find the tag
Look inside the main pocket or under the flap.
- Rub a hidden spot
A slick, rubbery feel often means a coating.
- Check the weave
Canvas shows a visible grain. Nylon looks smooth.
- Choose the method
Use the table. When unsure, choose thread or hook and loop.
Why Heat Harms Nylon and Coated Polyester
Nylon and polyester are plastics. Heat can melt or glaze them. Coatings can soften and peel.
- Melted fibers leave a shiny mark
- Soft coatings bubble under the iron
- Heat glue can bleed through thin fabric
Heat plus a few corner stitches holds longest on canvas. It is a common fix.
Swappable and gentle on the fabric.
Permanent and strong in rough use.
Quick, but only for canvas.
A pressing cloth lowers the risk. It does not remove it. Thread or hook and loop skips the problem.
Weight matters too. Heavy patches pull on thin fabric. Light bags suit light patches.
- Thin polyester suits small patches
- Thick canvas carries large patches
- Padded straps need very light patches
BAG TYPES
Backpack Types and the Patch Method That Suits Each
Bag shape hints at the fabric. Fabric then points to a method. Use this table as a first guess.
| Bag type | Often made of | Good method |
|---|---|---|
| School daypack | Polyester | Thread or hook |
| Hiking pack | Nylon | Thread or hook |
| Canvas rucksack | Cotton canvas | Any method |
| Roll-top bag | Coated fabric | Sewn loop panel |
| Laptop commuter bag | Nylon or polyester | Hook on a panel |
| Drawstring bag | Light polyester | Thread |
| Leather backpack | Leather | Thread |
- Light bags need small patches
- Rolltops need panels, not stitches through coating
- Keep drawstring bags clear of the cord
- Laptop bags suit flat patches on the outer pocket
- Leather bags need a sharp needle
Padded back panels stay patch-free. See the zone map later in this guide.
HOOK AND LOOP
Velcro Patches for Backpacks: How Hook and Loop Holds
Hook and loop is a two-part grip. One side has tiny stiff hooks. The other has soft loops.
- Hook
- Stiff little hooks sit on the patch back.
- Loop
- Soft looped fibers sit on the bag panel.
- Grip
- Hooks catch loops when you press together.
- Release
- Peel from one edge to separate them.
VELCRO is a brand name. Hook and loop is the general term. Both describe the same grip.
Pros
- Swap patches in seconds
- Several patches share one panel
- No needle holes in the bag
- Easy to move patches between bags
Limits
- Hook side adds a little bulk
- Loop collects lint over time
- Hooks can snag other fabric
- Needs a loop surface on the bag
Change patches with the school year or a trip.
Several small patches live on one panel.
Keep prized patches at home when you wash the bag.
Swap designs as interests change.
| Trait | Hook and loop | Sewn |
|---|---|---|
| Swap designs | Seconds | Not possible |
| Lies flat | Slightly raised | Flat |
| Needs loop panel | Yes | No |
| Stays on in the wash | Peel first | Yes |
Many school and trail packs come as a backpack with velcro for patches. The panel is already sewn in. If yours has none, the next two sections help. Browse our hook-backed patch options for sizes and styles.
| Part | Sits on | Faces |
|---|---|---|
| Hook | Patch back | Toward the bag |
| Loop | Bag panel | Toward the patch |
- Does the bag have a loop panel?
- Is the panel bigger than the patch?
- Is the panel flat, not curved?
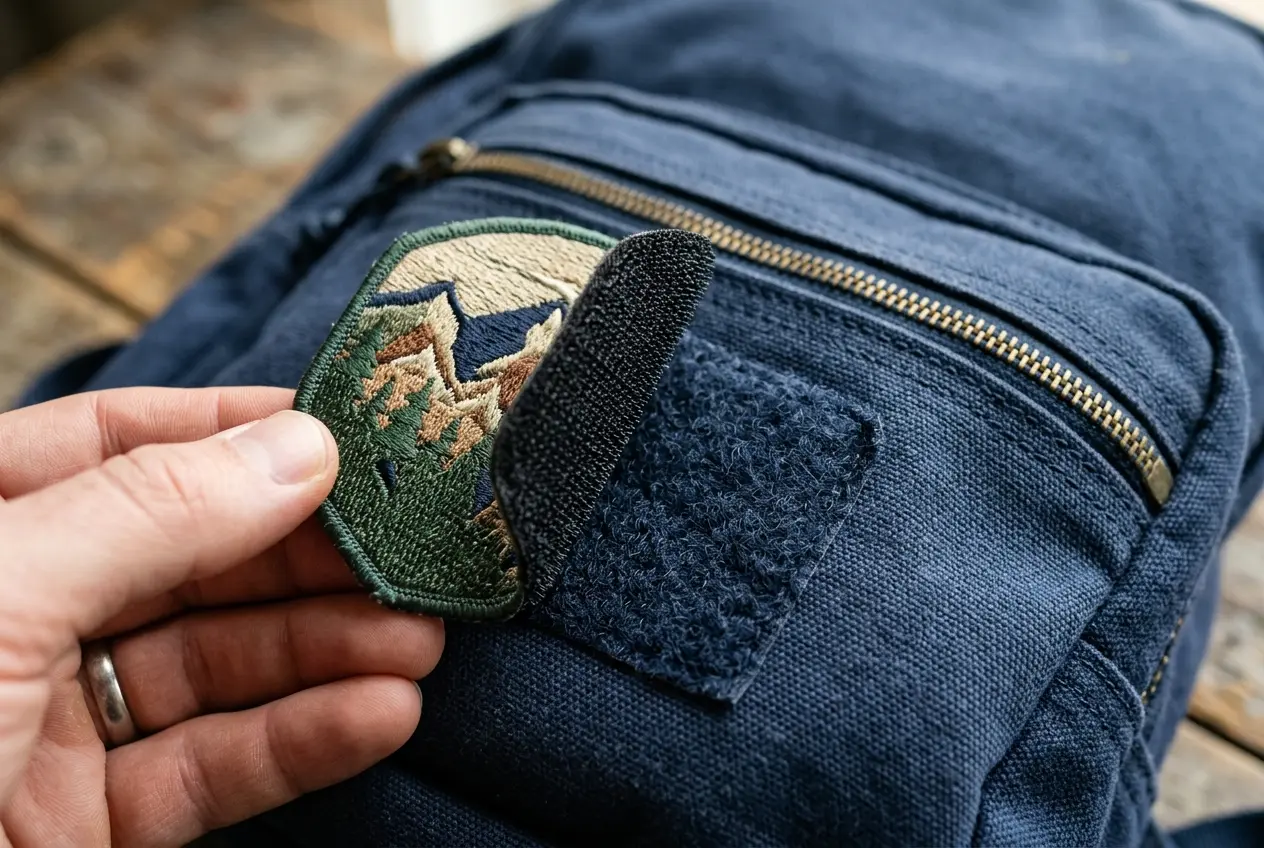
Hook and loop cannot grip smooth nylon by itself. It always needs a loop surface. The backing guide compares every attachment.
Pile height matters on the loop side. A thick panel grips hooks firmly. A thin one lets go sooner.
- Press from the center out
- Rub gently to seat the hooks
- Peel from one corner, never yank
LOOP PANELS
Backpack With Velcro for Patches: Spotting the Loop Panel
Some bags already carry a loop field. It feels fuzzy and soft. Run a finger over the pocket face.
- Fuzzy rectangle on the front pocket
- Soft strip along the top flap
- Loop square on a side pocket
- Small loop patch on a strap
- Full soft face on a flat panel
- Rough, scratchy fabric means hooks, not loops
| Panel type | Where it sits | Patch fit |
|---|---|---|
| Front field | Outside front pocket | Medium to large |
| Flap strip | Top flap or lid | Wide and short |
| Strap loop | Outer strap face | Small |
| Side field | Side pocket | Small to medium |
- Smooth nylon with no fuzz
- Mesh pockets
- Zipper tape
- Deep curves and seams
A panel sewn on all four sides holds heavy patches longer. One stuck on at the corners can peel.
Found no panel? You can add one. The next section shows how.
ADD A PANEL
Add a Loop Panel to a Bag That Has None
A loop panel gives any hook patch a place to grip. It turns a plain pack into a backpack with velcro for patches. You only need a flat spot.
- Sharp scissors
- Loop sheet or loop tape
- Heavy-duty needle
- Polyester thread
- Clips to hold the panel
- Pick a flat spot
Choose a smooth, seam-free area on the front pocket or flap.
- Cut the loop piece
Round the corners. Cut it slightly larger than your patch.
- Fix it in place
Sew the edges, or press on an adhesive loop sheet.
- Press the patch on
Push hook against loop. Check every corner.
- Cut slightly larger than the patch
- Round every corner
- Keep clear of zippers
- Leave the seam allowance free
| Method | Strength | Best fabric |
|---|---|---|
| Sewn edges | Strongest | Canvas, nylon, polyester |
| Adhesive sheet | Medium | Smooth flat fabric |
| Iron-on loop strip | Medium | Heat-safe canvas |
- Clean the spot with a damp cloth
- Dry the fabric fully
- Peel the backing slowly
- Press hard for a full minute
- Let it cure before use
Guides typically say to wait a day. Iron-on loop strips follow the heat rules above. Skip them on nylon.
Sewing a panel uses the same needle and thread as sewing a patch. Our sewing steps covers the stitches.
THREAD
Sewing Patch on Backpack: When Thread Beats Velcro
Thread suits patches you never plan to move. Sewing patch on backpack fabric works when no flat loop spot exists.
- Use a heavy-duty needle
- Pick polyester or nylon thread
- Double the thread for strength
- Backstitch every few stitches
- Stitch the outer layer only
Keep the lining free. Slide a card inside the pocket as you stitch. It stops you sewing the pocket shut.
| Fabric | Needle | Thread |
|---|---|---|
| Canvas | Heavy-duty | Polyester |
| Nylon | Heavy-duty | Nylon or polyester |
| Leather | Leather needle | Strong polyester |
| Padded strap | Long, heavy-duty | Strong polyester |
| Stitch | Strength | Look |
|---|---|---|
| Running stitch | Light | Small dashes |
| Whipstitch | Medium | Wraps the edge |
| Backstitch | Strong | Solid line |
- Wax the thread to stop tangles
- Pull thick layers with pliers
- Tie off inside a seam
- Stitch only through the outer shell
Full stitch steps live in our sewing steps. You can also order sew-on patch options with a flat back.
Take your time. Slow stitches look even and hold well. Rushed ones pucker.
- Knot twice inside a seam
- Trim thread tails short
- Check the back of the stitch line
HEAT
Iron-On Backpack Patches: Which Bags Can Take Heat
Heat is fast, but few packs can take it. Canvas and cotton duck usually can. Most nylon packs cannot.
| Bag type | Heat? |
|---|---|
| Canvas or cotton | Yes, with cloth |
| Cordura-style nylon | No |
| Ripstop nylon | No |
| Plain polyester | Test first |
| PU-coated fabric | No |
| Leather | No |
- Use a pressing cloth
- Skip the steam
- Press firmly, do not slide
- Guides typically say 20 to 60 seconds
- Let it cool before moving the bag
Heat is the riskiest way to fix a patch on backpack nylon. It melts the fiber in seconds. Choose thread or hook and loop instead.
- Cover
Lay a thin cotton cloth over the patch.
- Press
Press firmly with the iron on a cotton setting.
- Hold
Keep still for the time your guide lists.
- Cool
Let the patch cool before you lift a corner.
Pros
- Fast, no needle needed
- Flat, low-profile finish
- Good fit for canvas
Limits
- Risky on synthetic fabric
- Hard to remove cleanly
- Can fail on rough surfaces
On canvas, add a few stitches at the corners. It holds longer under rub.
Steps and settings are in our ironing steps. Browse iron-on patch options if your bag is canvas.
- Start with the shortest time
- Check the cloth for scorch marks
- Stop at the first shine
Guides disagree on timing because irons differ. Start short and check often. Stop if the fabric shines.
PROTECT THE BAG
Protect Waterproofing and Lining When You Add a Patch
Every needle hole is a tiny gap. On a waterproof bag, that matters. Plan your stitches with care.
| Option | Holes | Hold |
|---|---|---|
| Existing loop panel | None | Strong |
| Adhesive loop panel | None | Weaker on coating |
| Sewn loop panel | Many small holes | Strongest |
| Sewn patch | Holes along the edge | Strong |
- Use an existing loop panel first
- Keep stitches short and few
- Seal thread ends with a dab of seam sealant
- Never stitch through the inner lining
- Place patches away from main seams
Seam sealant is a common tip in patch guides. Dab just the knot. Let it dry fully.
ZONE MAP
Patch on Backpack Placement: A Zone Map
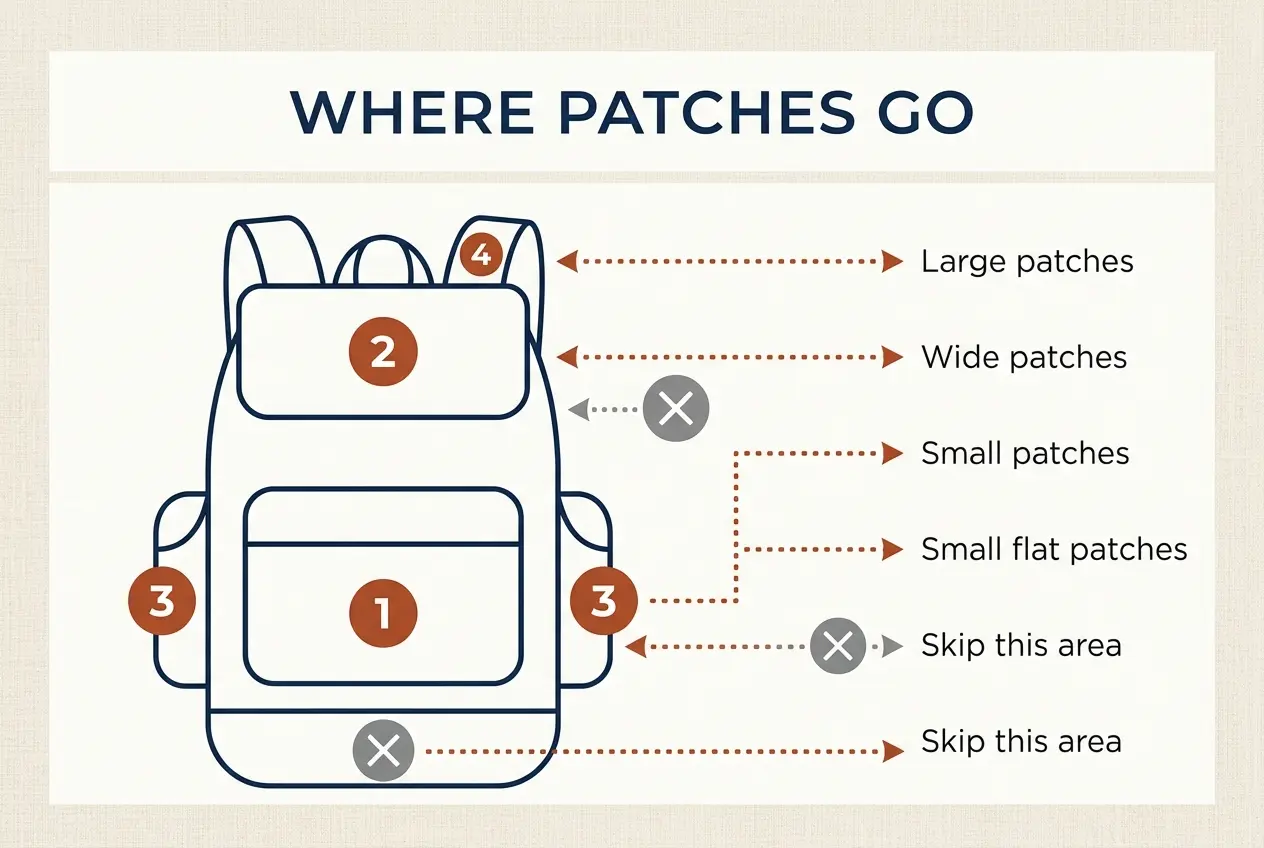
Placement decides how long a patch lasts. Flat zones keep patches neat. Moving zones wear them out.
| Zone | Suits | Watch out |
|---|---|---|
| Front pocket | Medium to large | Zipper edge |
| Top flap | Wide and short | Fold line |
| Side pocket | Small | Bottle rub |
| Shoulder strap | Small and flat | Flex and sweat |
| Back panel | Nothing | Rubs your clothes |
| Base | Nothing | Floor scuffs |
Front Pocket and Top Flap
These are the largest flat areas on most packs. They also face forward, so patches show. A hero patch sits well here.
- Keep patches off zipper teeth
- Leave a gap at the flap fold
- Center one hero patch on the pocket
Side Pockets and Shoulder Straps
These zones flex and rub. Small patches cope best. Keep them flat and light.
- Use small patches only
- Place on the outer strap face
- Avoid buckles and bend points
Back Panel and Base: Zones to Skip
The back panel presses against you all day. The base scrapes on floors. Neither zone suits a patch.
- Back panel rubs against clothes
- Base scrapes on every floor
- Seams pull at patch edges
- Rub
- Clothes and walls scrape patches. Worst on the back panel.
- Flex
- Straps bend all day. Stiff patches crack at the fold.
- Scuff
- Floors grind the base. Patches wear flat quickly.
- Seam
- Seams pull at patch edges. Keep patches off them.
Think about rub, flex and scuff before you stick anything down. A few minutes of planning saves a patch.
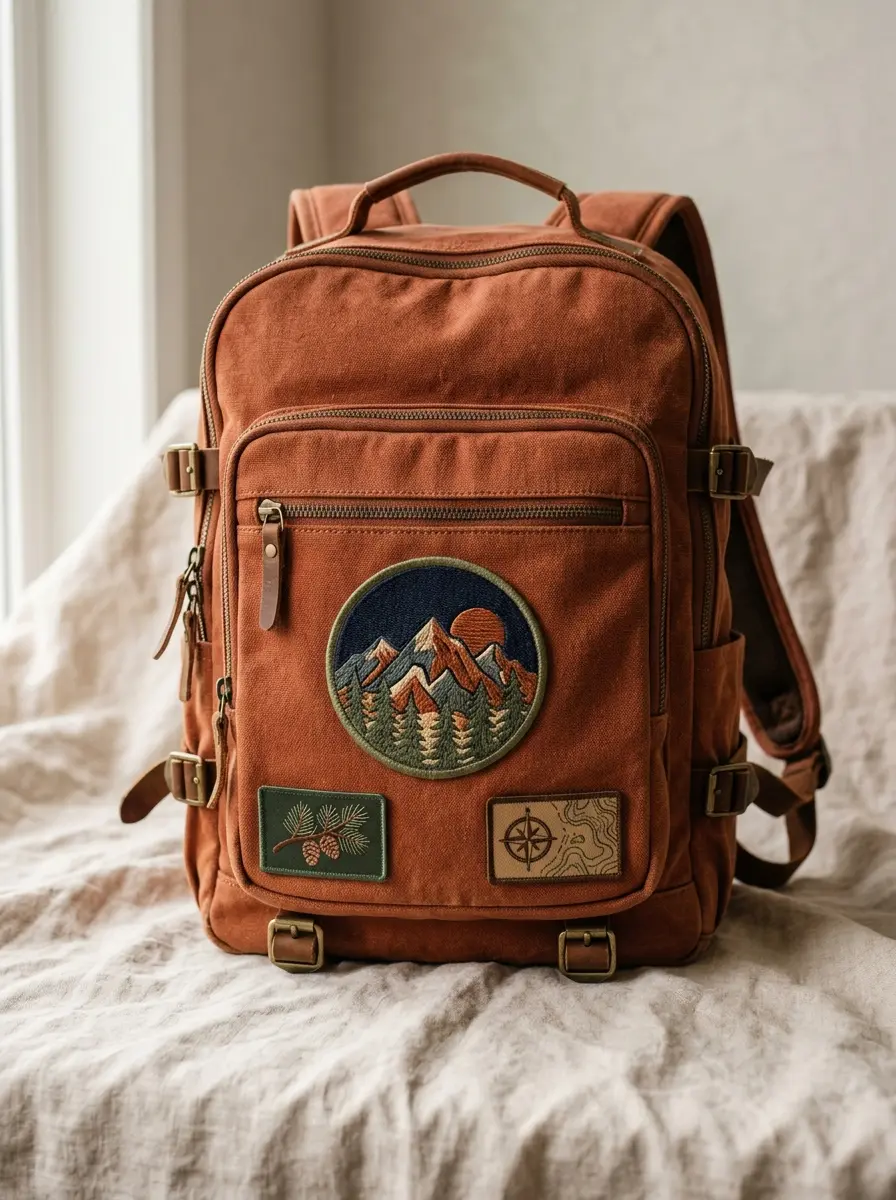
Placement affects daily use too. Leave pulls, clips and reflective strips free.
- Keep clear of zipper pulls
- Leave reflective strips uncovered
- Avoid hip belt buckles
- Leave the chest strap clip free
SIZE AND SPACING
How Many Patches and What Size Fit a Bag
Choose patches for a backpack by space, not by count. A panel only holds what lies flat. Measure your flat area first.
| Size in inches | Shape | Best spot |
|---|---|---|
| 2 x 1 | Small icon | Strap or pocket corner |
| 2 x 3 | Flag shape | Front pocket |
| 3 x 3 | Round badge | Front pocket |
| 4 x 2 | Name strip | Top flap |
| 4 x 4 | Hero patch | Front pocket |
| 5 and up | Large statement | Wide flat field |
Velcro patches for backpacks look best on a panel slightly larger than the patch. The margin hides any curl.
- One hero patch makes a clear focus
- A row of three suits a flap
- A grid fits a large panel
- Leave a small gap between patches
One large patch on the front pocket. Clean and bold.
Three small patches in a line along the flap.
Four to six patches in even rows on a big panel.
Mixed sizes grouped close. Keep one gap size.
- Lay the bag flat
- Measure panel width and height
- Subtract a small margin each side
- Pick sizes that fit inside
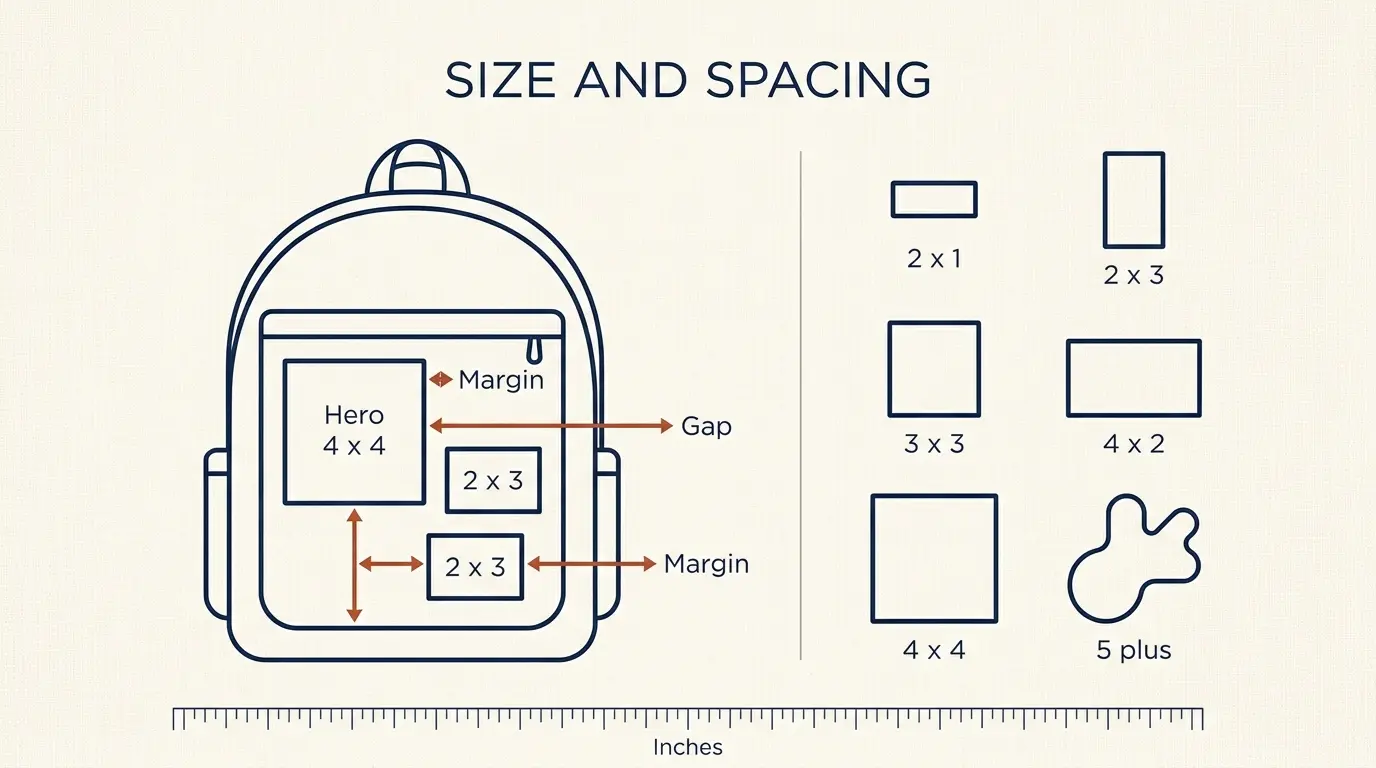
Visual weight matters. One big patch outweighs three small ones. Balance the panel by eye.
- Big patch near the top
- Small patches fill the gaps
- Repeat one color across patches
LAYOUTS
Three Backpack Layouts You Can Copy
A plan beats guesswork. These layouts use sizes from the table above. Pick one and scale it to your panel.
One 4 x 4 hero patch centered on the front pocket. Add a small name strip on the flap.
Three 2 x 3 patches in a line across the pocket. Keep equal gaps.
Six small patches in two rows on a large loop panel. Swap one after each trip.
A wide name strip on the flap and one small patch on a strap.
- Keep gaps equal
- Align the edges
- Match heights in a row
- Repeat one thread color
Layouts work best when one patch leads. Let the others support it.
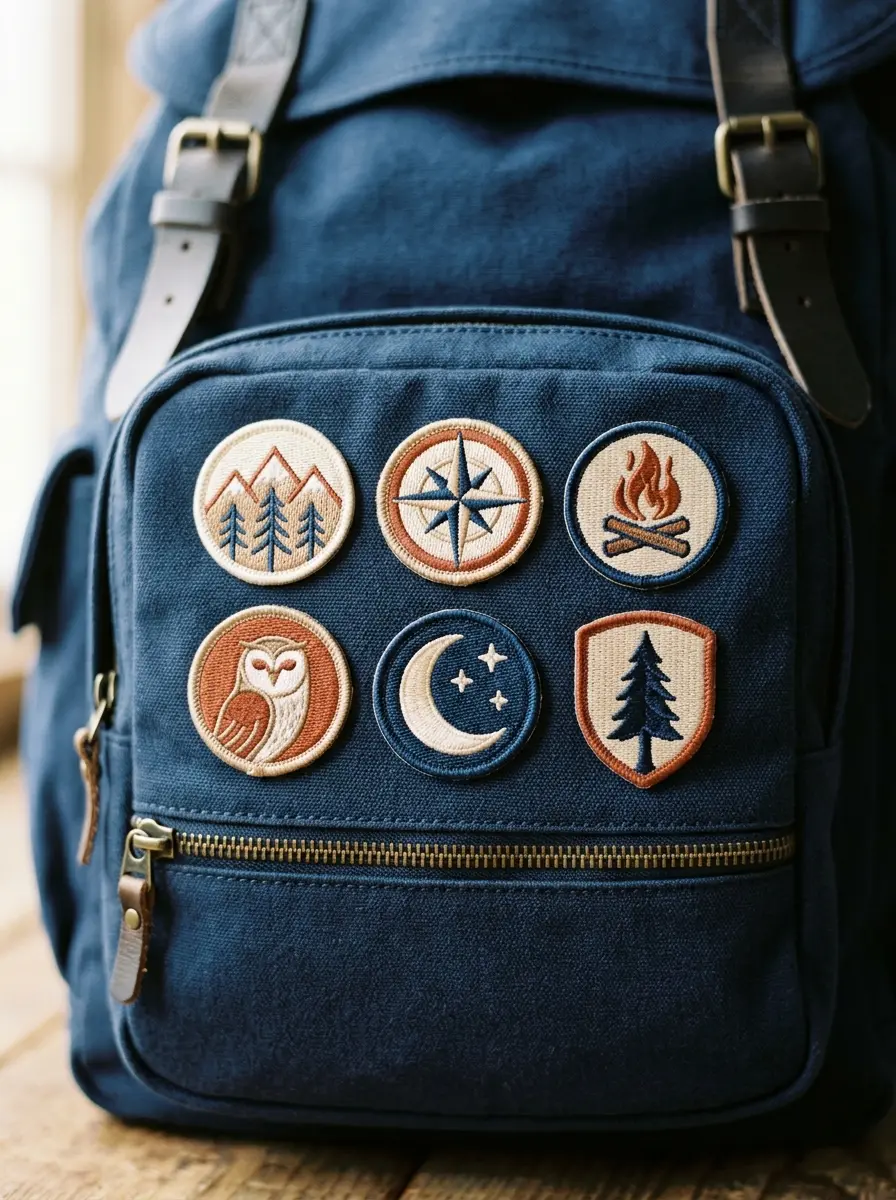
Check your layout against the bag shape. A tall pack suits tall layouts. A wide pocket suits rows.
NAME STRIPS
Name Patch for Backpack: Labels That Get Bags Back
Bags look alike in a school hallway. A name label fixes that. A name patch for backpack owners works best as a wide, short strip.
- Use a first name or initials
- Choose light thread on dark twill
- Keep letters tall and simple
- Place it on the top flap
- Skip the home address and phone number
| Spot | Reads well | Tip |
|---|---|---|
| Top flap | At arm's length | Wide strip |
| Front pocket | Across a room | Larger letters |
| Under the grab handle | Up close only | Small strip |
Plain block letters read best. Script fonts blur at small sizes. Thick strokes stay clear.
- First name alone
- Initials in block letters
- Name and class
- Group or club name
Our name patch page covers lettering and styles.
Lost bags turn up at school gates and airports. A clear label gets a bag home faster. Put the name where staff can see it.
- Name on the flap
- Initials on a strap
- Large letters on the front pocket
USE IDEAS
Backpack Patch Ideas for School, Hiking, Travel and Work
Each bag lives a different life. Spelled back pack or backpack, the rules stay the same. Patches for back packs follow the fabric first.
Swap patches by season with hook and loop. Add a name strip.
Rain and mud test patches. Keep them on flat zones.
Overhead bins rub bags. Keep patches on the front face.
Laptop bags suit one small patch on the flap.
Crowded bags need an easy visual ID.
Daily rub favors thread on the pocket face.
| Use | Main risk | Best method |
|---|---|---|
| School | Locker rub | Hook and loop |
| Hiking | Rain and mud | Thread |
| Travel | Bin rub | Thread or hook |
| Work | Desk wear | Hook and loop |
Pick the method that fits the risk. A school bag needs swaps. A trail pack needs a firm hold.
- Pick one theme per bag
- Repeat one color for unity
- Keep the biggest patch near the top
- Leave room to add more later
Custom patches for backpacks can take any shape or size. Team looks are covered in the patch placement guide.

Seasonal swaps keep a bag fresh. Spring patches can replace winter ones in seconds.
- Pick a color story per season
- Keep one favorite patch fixed
- Store spare patches flat
KIDS' BAGS
Kids' Backpacks: Easy Swaps and Safe Edges
Kids change their minds often. Hook and loop lets them swap patches without needles. It also keeps pins out of the picture.
- Choose flat patches with stitched borders
- Avoid pins and loose beads
- Check corners every week
- Press patches on with a helper
- Add a name strip near the top
Keep patches small and flat. A parent presses them on.
Let them plan the layout. Hook and loop makes swaps easy.
Loose threads are worth a quick snip. Check them as often as you check zippers.
PATCH ANATOMY
Patch Anatomy for Bags: Thread, Twill Base and Backing
Five parts decide how a patch behaves on a bag. Knowing them helps you order well.
- Face
- The stitched design you see.
- Thread
- Our patches use polyester thread.
- Base
- Our patches sit on a polyester twill base.
- Border
- The stitched edge that holds the shape.
- Backing
- Hook, sew-on or iron-on. It sets how the patch attaches.
| Part | Job on a bag |
|---|---|
| Face | Shows your design |
| Thread | Resists daily rub |
| Base | Holds the shape |
| Border | Guards the edge |
| Backing | Sets the attachment |
Compare patch types in our patch type comparison. Choose the backing last, after the bag fabric.
HOW TO ORDER
Custom Patches for Backpacks: What to Send Us
We make every patch to order. You send the size, backing and art. We send a free proof.
- Measure the panel
Note the flat area in inches.
- Pick the backing
Choose hook, sew-on or iron-on to match your fabric.
- Send your art
AI, EPS or PDF files work best. PNG and JPG also work.
- Approve the proof
You get a free Pantone-matched digital proof in 24 hours.
- Receive your patches
Production takes 10 to 14 business days. Rush takes 5.
| Detail | What to send |
|---|---|
| Size | Width and height in inches |
| Backing | Hook, sew-on or iron-on |
| Colors | Pantone codes or art file |
| Text | Exact spelling |
| Quantity | One to 100,000 |
| Bag fabric | Canvas, nylon or other |
| Bag fabric | Backing to order |
|---|---|
| Canvas | Iron-on, sew-on or hook |
| Nylon | Sew-on or hook |
| Polyester | Sew-on or hook |
| Coated fabric | Hook on a sewn panel |
| Leather | Sew-on |
Vector art gives the sharpest edges. Send AI, EPS or PDF if you have them. Other formats still work.
- Ordering larger than the flat panel
- Forgetting to pick a backing
- Sending low-resolution art
- Guessing the bag fabric
See pricing for costs. Unlimited free revisions come with every proof.
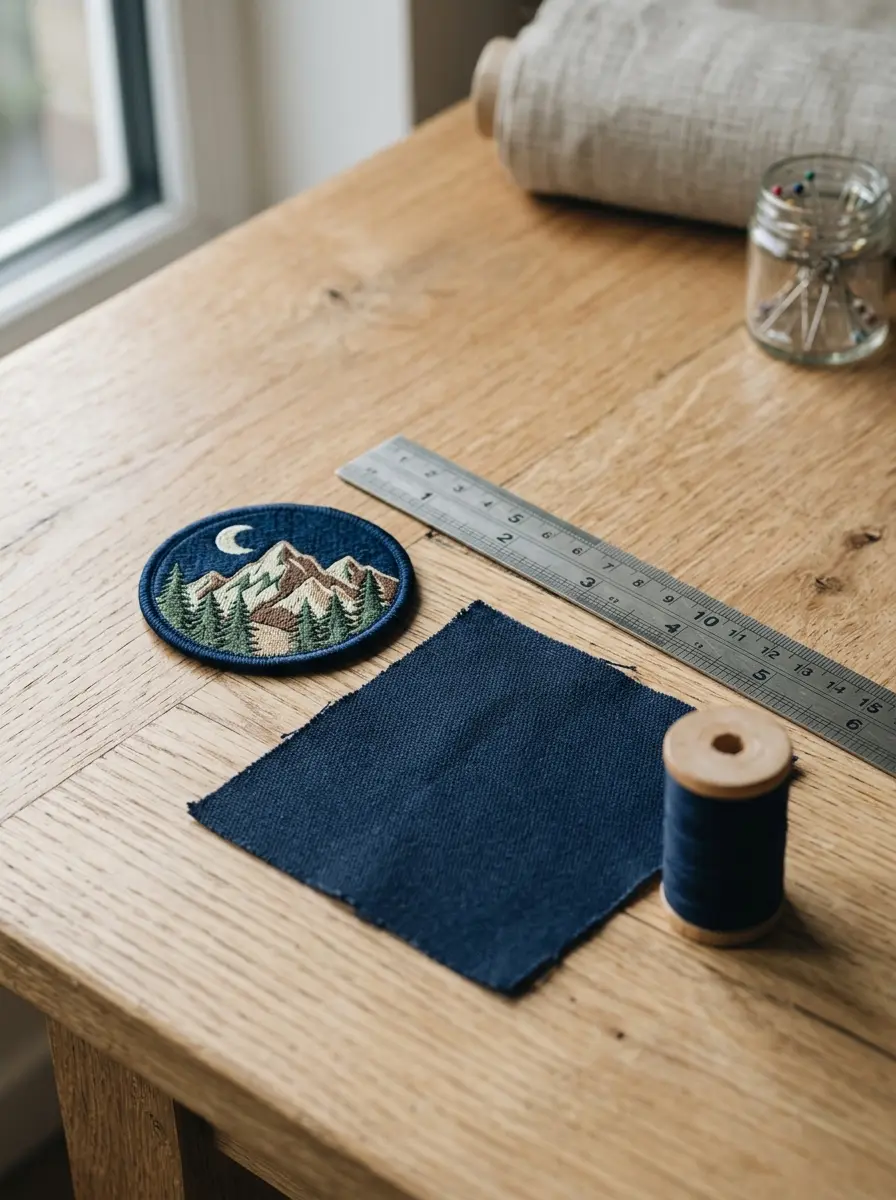
One patch or one hundred, the steps stay the same. There is no minimum order. Shipping is duty-free worldwide.
- Name the bag fabric in your quote note
- List your preferred backing
- Send the panel size in inches
FIXES
Why Backpack Patches Fall Off and How to Fix Them
Most failures have simple causes. Lint, wear and a wrong size lead the list. Velcro patches for backpacks fall off most often from lint.
| Problem | Cause | Fix |
|---|---|---|
| Corners lift | Patch too big | Match panel size |
| Weak grip | Lint in loop | Brush or tape clean |
| Patch slips off | Not pressed | Press center out |
| Edges fray | Bag rub | Move to flat zone |
| Adhesive peels | Coated fabric | Sew loop edges |
| Threads snag | Open hooks | Store on loop sheet |
Hook and Loop Patches for Backpacks: Lint, Snags and Storage
- Brush the loop with a stiff brush
- Lift lint with sticky tape
- Press patches firmly from the center out
- Store hook sides on a spare loop sheet
- Remove patches before washing the bag
Still loose? Rescue it in four short steps.
- Peel it off
Lift from one corner. Pull slowly.
- Clean both sides
Brush the loop. Wipe the hook side.
- Press again
Push firmly from the center out.
- Add stitches
Tack the corners if it still lifts.
Sewn patches rarely need rescue. Loose threads can be re-stitched in minutes.
- Lint
- Fibers fill the loops and weaken the grip.
- Curl
- Edges lift when the patch outsizes the panel.
- Rub
- Daily friction frays unprotected borders.
- Heat
- A hot car can soften glue and weaken a bond.
KEEP IT CLEAN
Keep a Patched Backpack Clean Between Trips
A patched bag needs gentler cleaning. Dirt hides in loop fibers and stitched borders. A few habits keep both fresh.
| Situation | What to do |
|---|---|
| Muddy trail | Let it dry, then brush |
| Rain soaked | Air dry with pockets open |
| Sticky spill | Dab gently, do not rub |
| Linty loop panel | Brush or lift with tape |
| Full wash needed | Remove hook patches first |
- Empty the bag completely
- Brush off dry dirt
- Spot clean with a damp cloth
- Air dry away from direct heat
Sewn patches follow the steps in our care guide.
AVOID THESE
Backpack Mistakes to Avoid When You Add Patches
Most bad results trace back to six habits. Each has a quick fix. Skim the table before you start.
| Mistake | What happens | Fix |
|---|---|---|
| Heat on nylon | Fabric melts | Use thread or hook |
| Patch bigger than panel | Edges curl | Measure first |
| Stitching through lining | Pocket sewn shut | Slide a card inside |
| Adhesive on coating | Patch peels | Sew the loop edges |
| Patches on the base | Fast wear | Use the front face |
| No test fit | Crooked layout | Lay it out first |
Mistakes cost time and sometimes a good bag. A short test saves both.
- Lay patches out before fixing
- Test glue on a hidden hem
- Photograph the layout first
Patience pays on bags. A patch looks permanent from day one. Fixing a bad layout is harder.
- Mark positions with chalk or tape
- Pin the layout with removable tape
- Step back and check from three feet
READY TO ORDER
Send Your Backpack Patch Art for a Free Proof
Upload Artwork
Send any common file format.
Approve Your Proof
Free digital proof within 24 hours.
We Ship Worldwide
Standard 10 to 14 business days. Rush in 5.
Tell us the size and backing, and we make it to order.
No minimum. Free proof in 24 hours. Ships to 50+ countries.
COMMON QUESTIONS
Backpack Patch Questions
Can you iron a patch on a nylon backpack?
Usually no. Heat can melt or glaze nylon and leave a shiny mark. Choose thread or hook and loop instead. Use the fabric table above to match your bag.
What is the best way to attach a patch on backpack fabric?
It depends on the fabric. Hook and loop and thread suit most packs, while heat suits canvas only. Check the fabric table, then pick the method.
Do I need a backpack with velcro for patches?
No. You can add a loop panel to any bag with a flat spot. Sew the edges for the strongest hold. Or use an adhesive sheet on smooth fabric.
Will velcro patches for backpacks fall off in a school bag?
Not if the loop is clean and the patch is pressed firmly. Lint is the usual cause. Brush the loop and check the corners often.
Can I add a loop panel to a backpack without sewing?
Yes. An adhesive loop sheet works on smooth, flat fabric. It can peel from coated or textured fabric, so sewing the edges lasts longer.
How big should a name patch for backpack use be?
A wide, short strip reads best. Match it to the flat area on your flap. Guides often show names near four inches wide, but measure your own bag.
How many patches for a backpack is too many?
There is no fixed limit. Stop when the panel looks crowded or edges overlap. Leave a small gap between patches and keep them on flat zones.
What size are patches for back packs and school bags?
Guides typically list sizes from 2 x 1 to 5 inches and up. Measure your flat panel, then pick a patch slightly smaller than it.
Can I put a patch on a leather backpack?
Yes, with thread. Use a leather needle and strong polyester thread. Skip heat, which can mark leather. A sewn loop panel also works well.
Will a patch damage a waterproof backpack coating?
It can. Needle holes may let water in, and heat can harm the coating. A loop panel on a seam-free area keeps any damage small.
Where do patches go on a backpack strap?
Place a small patch on the outer face of the strap. Pick a flat stretch. Avoid buckles and bend points where the fabric flexes all day.
Do patches make a backpack heavier?
Slightly. Small embroidered patches add little weight. Large or thick patches on straps can feel stiff or rub. Keep strap patches small and light.
Should the patch be smaller than the loop panel?
Yes. Leave a small margin around the patch. Overhanging edges can curl and catch on things. They slowly pull the patch away.
Can I move patches between two backpacks?
Yes, if both bags have a loop panel. The patches need a hook back. Peel gently from one edge, then press the patch onto the new panel.
Will hook patches snag other bags and clothes?
They can. Exposed hooks catch knits and fleece. Store loose patches on a spare loop sheet, hook sides down. Use them when you are ready.
Do patches work on a rolltop backpack?
Yes, with care. Use an existing loop panel or an adhesive one to avoid holes. Keep patches off folds and seams where the bag closes.
Can kids swap their own backpack patches?
Yes, with hook and loop. Press firmly and check the corners each week. Younger children may need help pressing patches on evenly.
How do I stop backpack patches from fraying?
Choose a patch with a stitched border and keep it on a flat zone. Avoid rub points like the back panel, the base and strap bend points.
Can I wash a backpack with patches on it?
Remove hook patches first. Spot clean the bag, air dry it open and skip hot water. Sewn patches can stay, but gentle care helps.
Do hook patches work on a canvas rucksack?
Yes. Canvas suits a sewn loop panel. It also takes thread and careful heat. Pick the method by how often you swap patches.
Can I put patches on a bag with padded straps?
Yes, but keep them small, flat and light. Put them on the outer face away from buckles. Skip the padded back panel, where patches rub against you.
How do I measure my backpack panel before ordering a patch?
Lay the bag flat. Measure the width and height of the flat area in inches. Subtract a small margin, then send us those numbers with your art.
KEEP EXPLORING